

You might want to use a plugin to better manage and engage your contacts with forms, live chat, and email marketing. Or you might want to add custom CSS code to create a sticky navigation menu. In short, you realize you need the functionality and flexibility of a content management system to continue to grow your business online.
Thankfully, you have options for migrating Wix to WordPress, which is what I'm going to cover in this post. I’ll share the benefits of converting your website and provide a step-by-step guide.
Table of Contents
- Why Convert From Wix to WordPress
- Pre-Migration Steps for Converting Wix to WordPress
- How to Migrate from Wix to WordPress
Why Convert From Wix to WordPress
Both Wix and WordPress are excellent options for building a website. Offering built-in functionality, templates, and add-ons, both platforms enable users without technical knowledge to create and customize a site without needing to code or even knowing how to code.
When comparing Wix vs. WordPress, it’s important to note that one isn’t better than the other — it’s just that they present two very different approaches to creating and managing a website.
Wix is a website builder that offers the website building tools and hosting required to create and launch a site quickly. With Wix, you can purchase your own custom domain. You can modify over 900 pre-designed templates to quickly create your site, or start from scratch to completely customize it. You can even take advantage of its AI website builder to create fully functional website in mintues. Then, add video backgrounds, scroll effects, and animations to make these pages interactive and memorable.
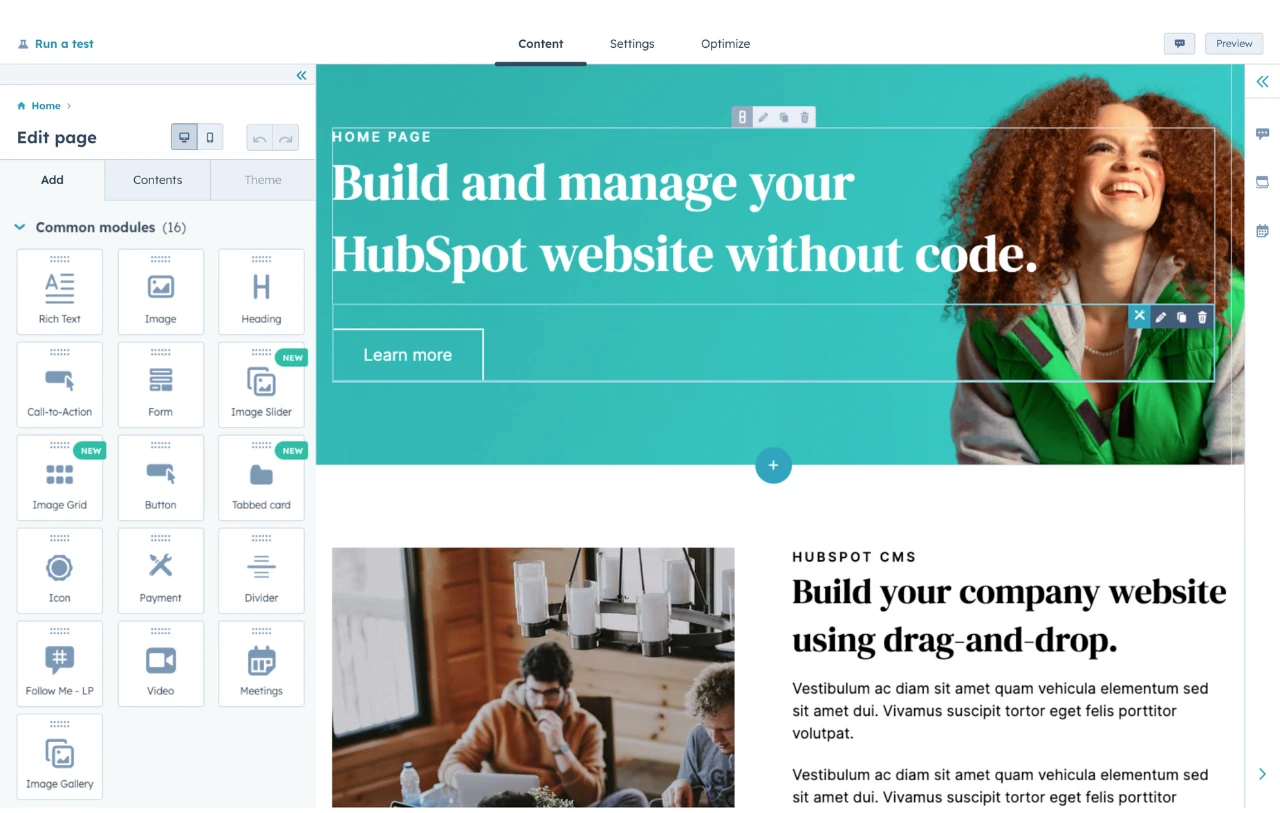
HubSpot's Free Website Builder
Create and customize your own business website with an easy drag-and-drop website builder.
- Build a website without any coding skills.
- Pre-built themes and templates.
- Built-in marketing tools and features.
- And more!
Limitations of Using Wix and Other Website Builders
While Wix makes launching a new site relatively easy, the platform does have some limitations when it comes to customization.
- You can’t add forms to blog posts. Wix currently doesn’t have the option for forms on blog posts — an inconvenience if you’re looking to gather visitor information or get signups. Instead, they offer a workaround where you can create a new page, create a form on that, and then link to it from your blog post. Having to navigate to another page just to fill out a form creates unnecessary friction for users, making it a less effective way to gather information.
- You can’t switch templates once the site is live. Choose your Wix template wisely as you won’t be able to change it once your site is live. (However, you can create as many sites as you want in your Wix account and transfer your plan, domain, media, and other elements from your old site to your new one.)
- You can’t access or change the HTML of your site. Currently, Wix users cannot access the HTML code on their site. However, using Velo by Wix, you can add a few more features like database collection to the Wix editor if you choose. You can also add custom HTML tags from the editor.
For users who don’t have the time to use or manage a robust number of out-of-the-box features, add-ons, and custom code, Wix is ideal for creating a basic site with lots of visual content.
However, once you start to outgrow your basic website, you might want the flexibility of a full-service content management system (CMS) like WordPress.
Not only does the core WordPress software make it easy to manage your site‘s content, but you’ll also be able to use the thousands of WordPress themes and plugins to gain full control over every single part of your site.
For example, you could use the Elementor page builder plugin to access visual, drag-and-drop designs like Wix and the HubSpot WordPress plugin to access a powerful CRM and marketing tools.
Pre-Migration Steps for Converting Wix to WordPress
Now that I briefly covered a few reasons to switch from Wix to WordPress, I want to get straight into the actual tutorial.
I'm going to divide the tutorial into two main parts, each of which will have its own steps:
- Pre-migration steps that you'll perform outside of Wix. This mainly involves setting up your basic WordPress site so that it's ready to receive content.
- The process of moving Wix content to WordPress. You can move some types of content automatically, while other types of content will require some manual effort.
Let's start at the very beginning. Before you can begin exporting content from Wix, you need a basic WordPress site where you can import that content.
Below, I'll cover how to set up your basic WordPress website so that you can get it ready to migrate your content from Wix.
Step 1: Purchase web hosting.
You’ll need to sign up for a hosting service for your WordPress site. If you’re looking for a similar experience to Wix, then try managed WordPress hosting.
Managed WordPress hosting offers more of a concierge service and will take care of a lot of basic maintenance for you, such as applying WordPress updates and backing up your site's data every day.
There are dozens of hosting providers to choose from and plenty of other types of hosting available. If you need some suggestions to start, SiteGround, WP Engine, and WPMU Dev offer managed hosting as well as other types of plans and have a reputation for reliability and high performance.
For my example screenshots, I'll use SiteGround. However, the same basic steps will apply to literally any WordPress host — the interface just might be a bit different.
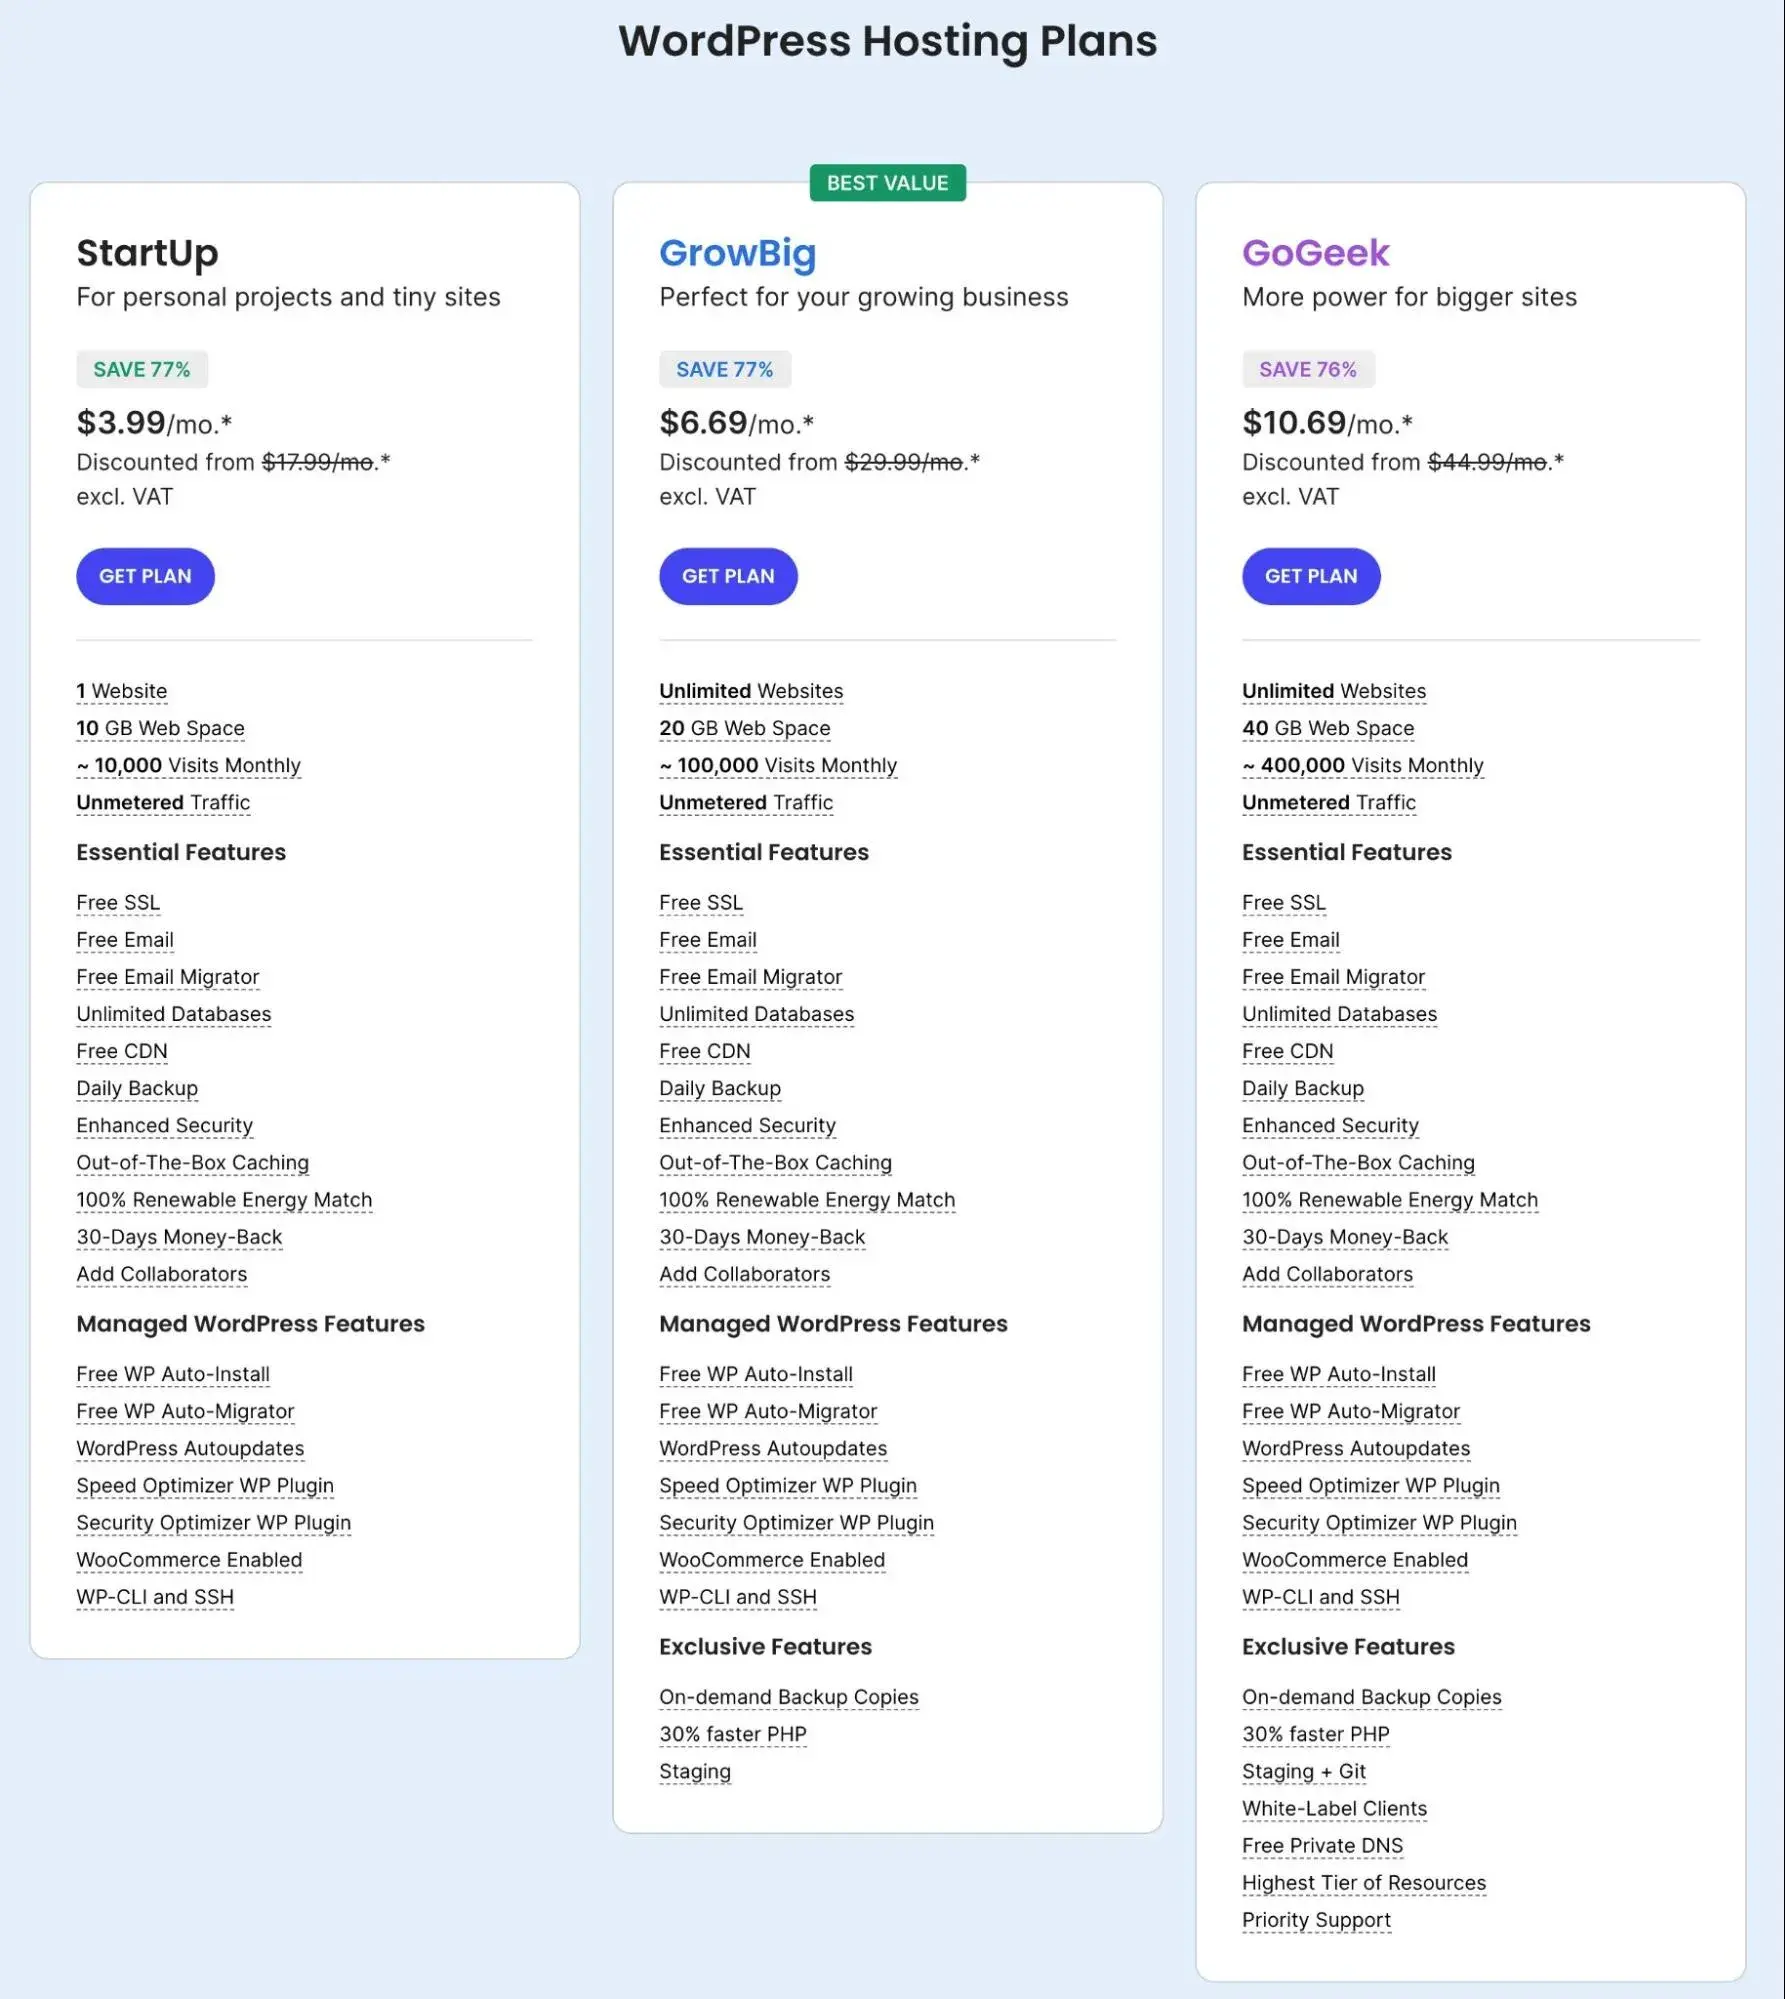
Once you’ve selected a web hosting provider and type of hosting, you’ll have to choose a plan that has the bandwidth, storage, and security required for your site. Most providers offer multiple plans with more features available at a higher price tag. You can take a look at SiteGround’s hosting packages below.
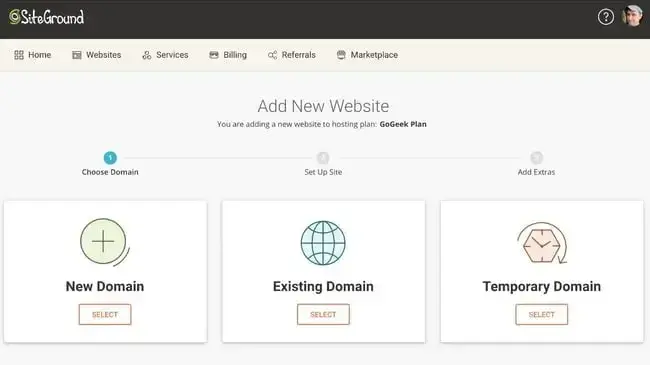
Step 2: Set up a temporary domain.
After selecting a web hosting plan, you’ll be asked to either purchase or connect a domain. Since your Wix site is still live at this point, you can set up a temporary domain for your WordPress site while you migrate all the content over.
Once you‘ve successfully migrated your Wix content to WordPress, you can then transfer your domain from Wix to WordPress, which I’ll cover later in this tutorial.
For the sake of this tutorial, let’s say you selected one of the above hosting plans with SiteGround. You can see that SiteGround offers it as an option in its sign-up process below.
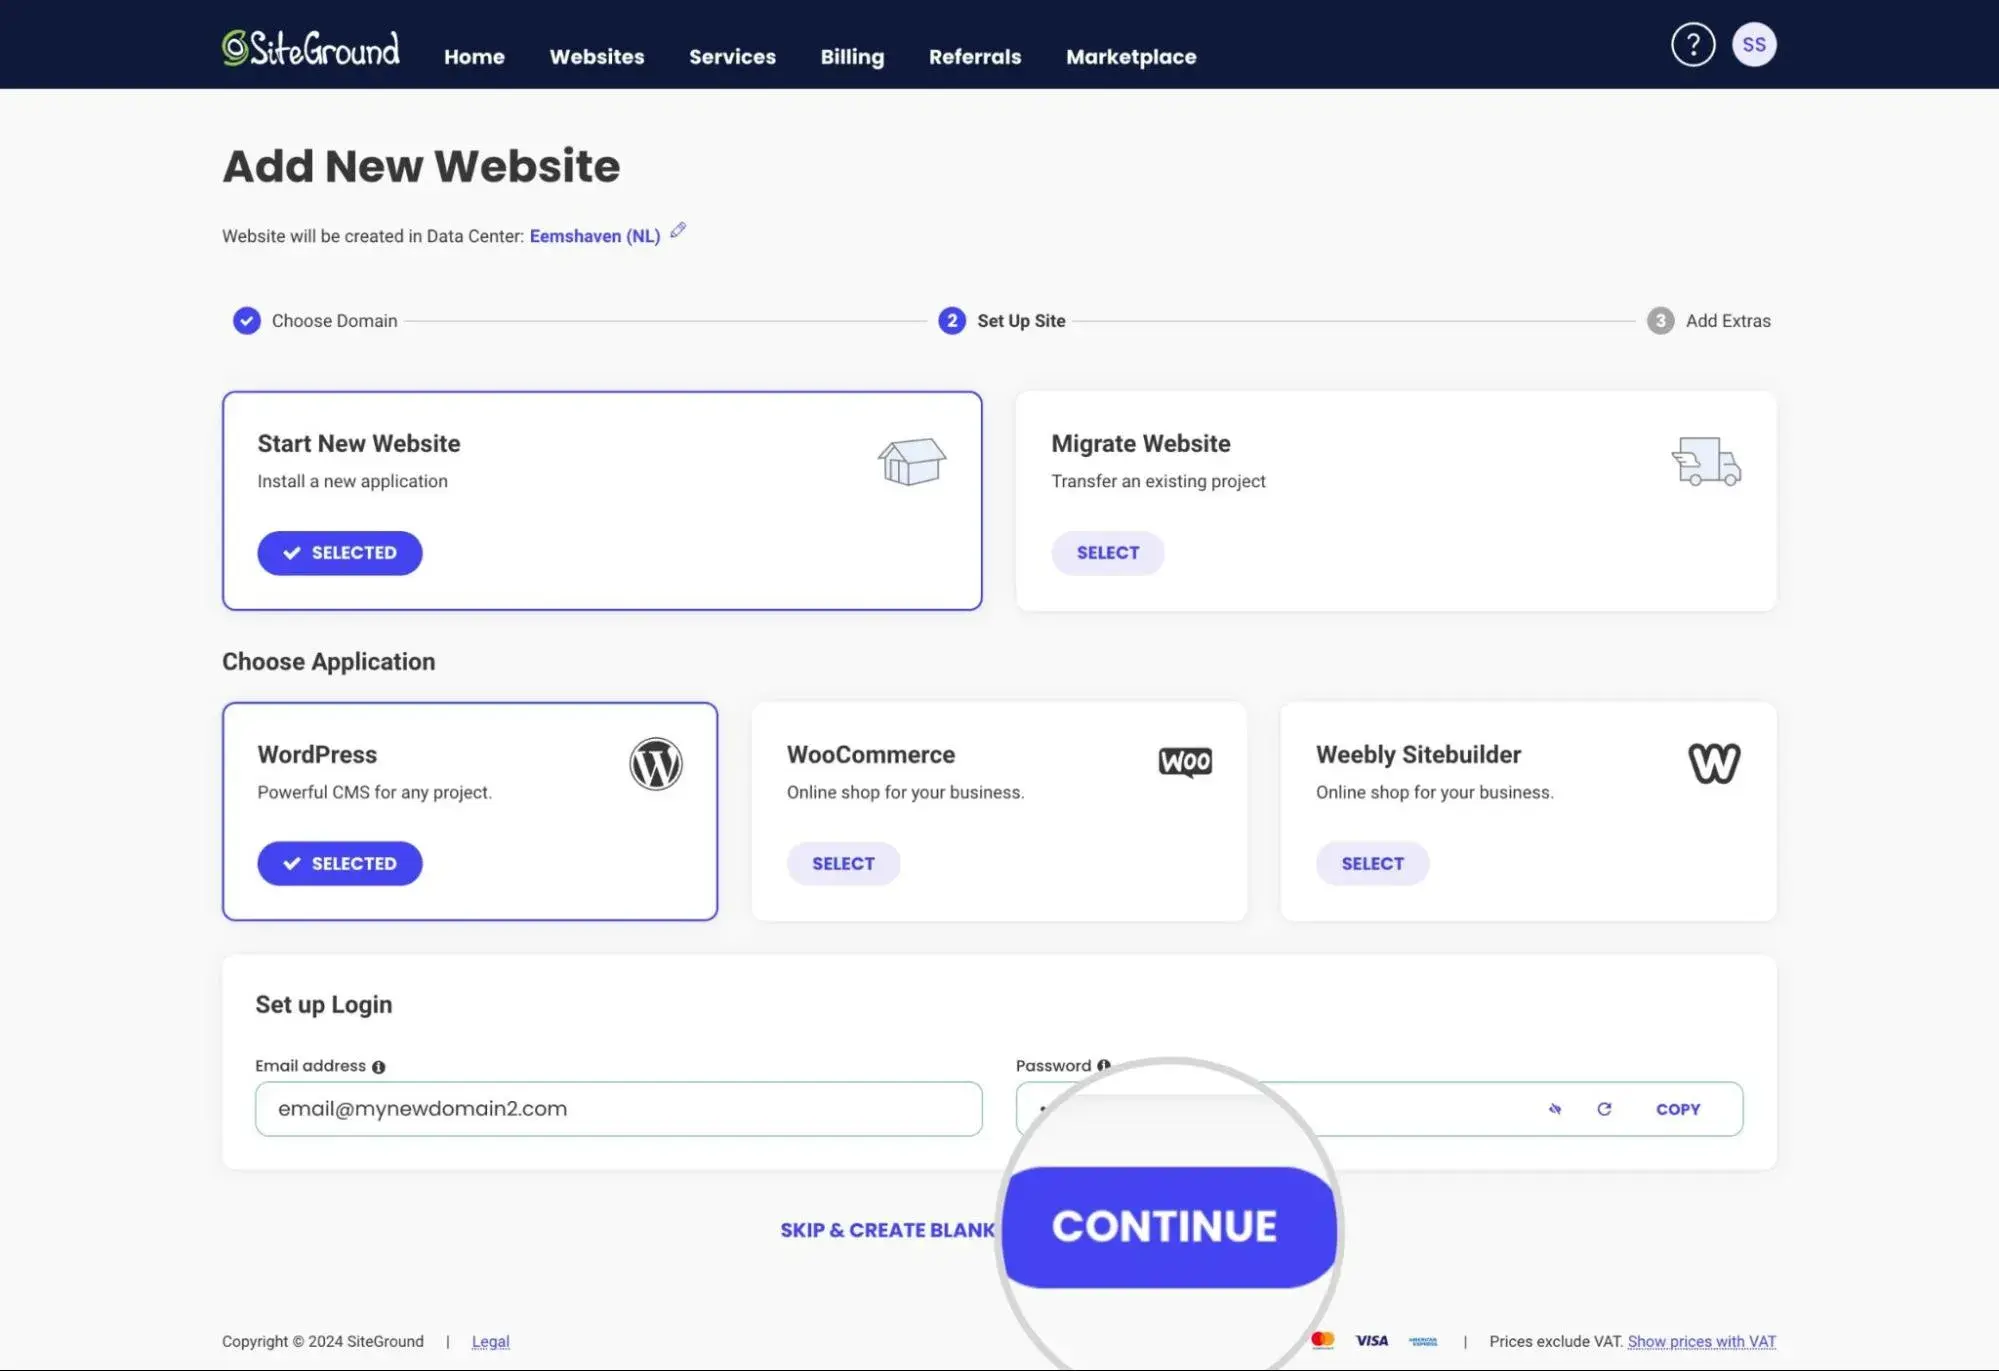
Step 3: Install WordPress.
Now it’s time to install the WordPress software. Most hosting providers offer an automated installation process. Let’s walk through this process for SiteGround below.
Once you’ve signed up for a plan and set up a temporary domain, log in to your new web hosting account. You’ll see a pop-up window asking if you want to set up your website now.
Once SiteGround finishes the install (which should only take a minute or two), you should see a confirmation message appear (and you might also receive an email).
There are only a few more steps to complete before importing your Wix content to your new site.
Step 4: Change your new site’s permalink settings.
First, you need to change the permalink structure of your site in your WordPress dashboard to optimize it for search engines.
To begin, log in to your WordPress site's dashboard.
You can access your dashboard by going to yoursite.com/wp-admin, making sure to replace yoursite.com with your site's actual domain name.
You can then log in with your WordPress username and password (not your hosting account credentials). At SiteGround, you chose these credentials as part of the setup wizard.
If you‘re using a different web host, they might have included the credentials as part of a welcome email, if you didn’t create them yourself.
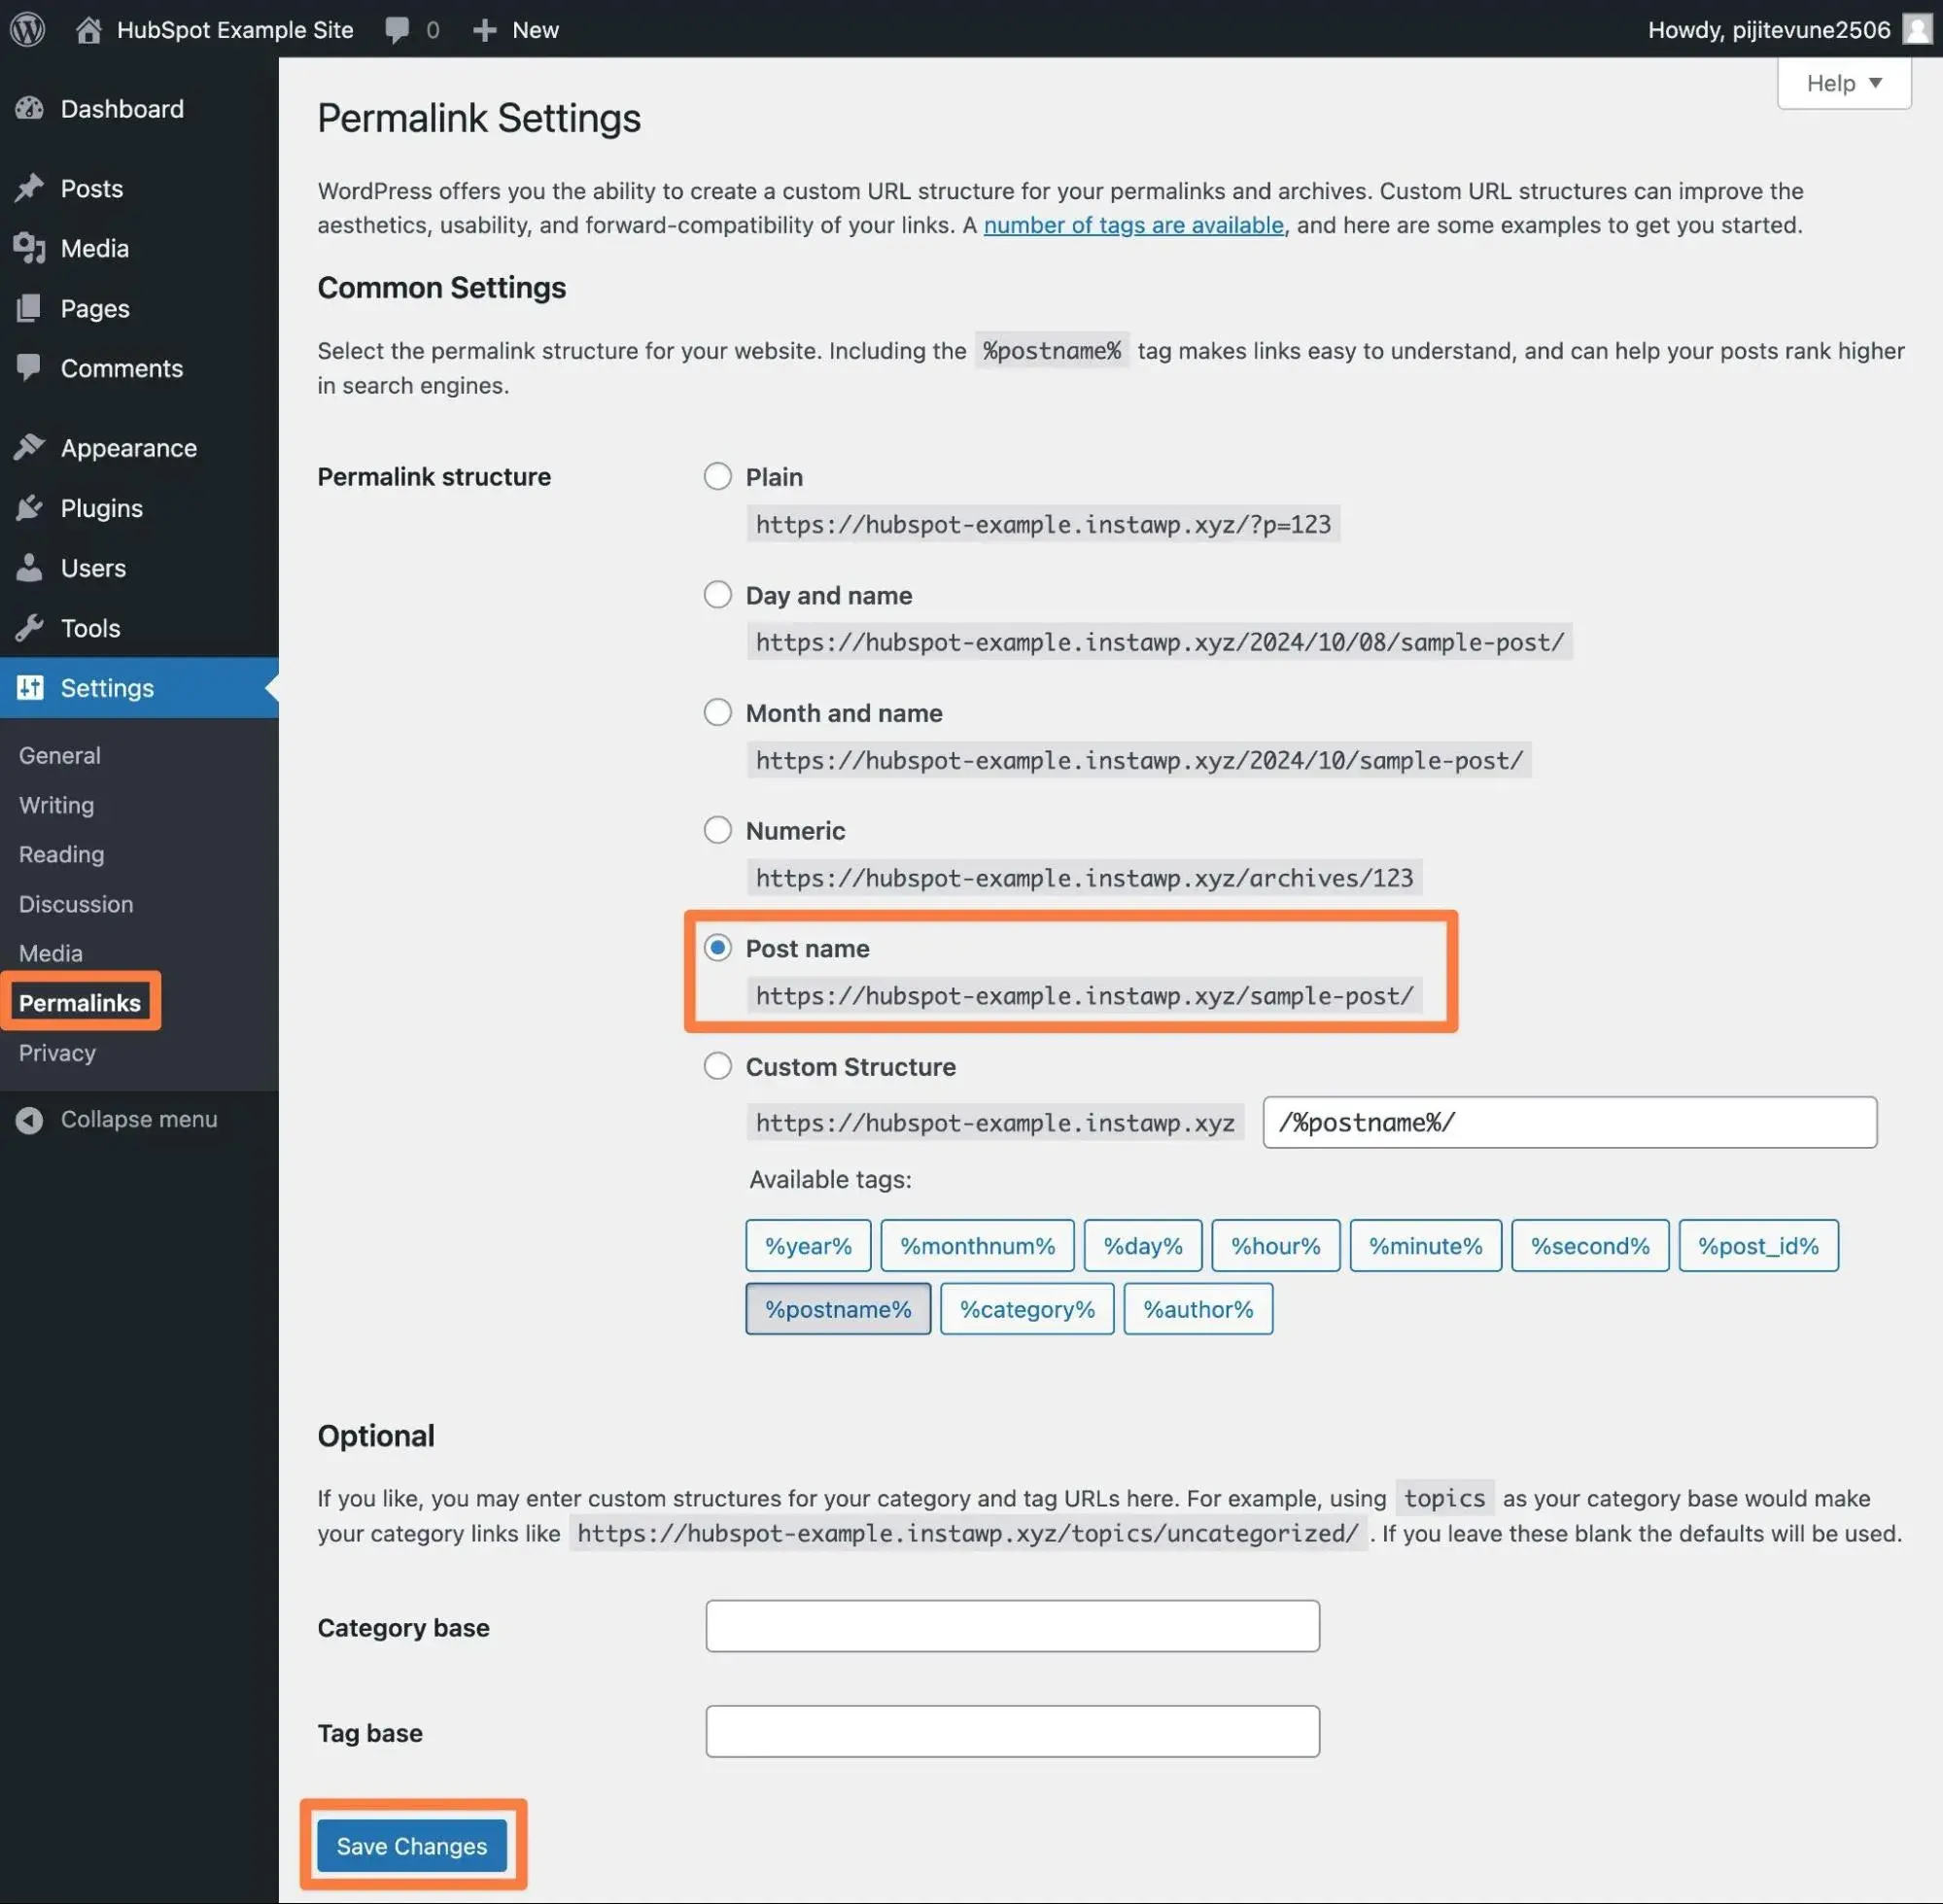
Once you're logged in to your WordPress dashboard, navigate to Settings > Permalinks. Then, select the “Post Name” permalink option and click Save Changes at the bottom.
Step 5: Install a theme.
Last step before you begin importing content!
While your posts, pages, and media content can be exported from your Wix site and imported to your WordPress.org site, you can't bring along your Wix template.
The good news is you can easily find and install a WordPress theme for your new site.
HubSpot's Free Website Builder
Create and customize your own business website with an easy drag-and-drop website builder.
- Build a website without any coding skills.
- Pre-built themes and templates.
- Built-in marketing tools and features.
- And more!
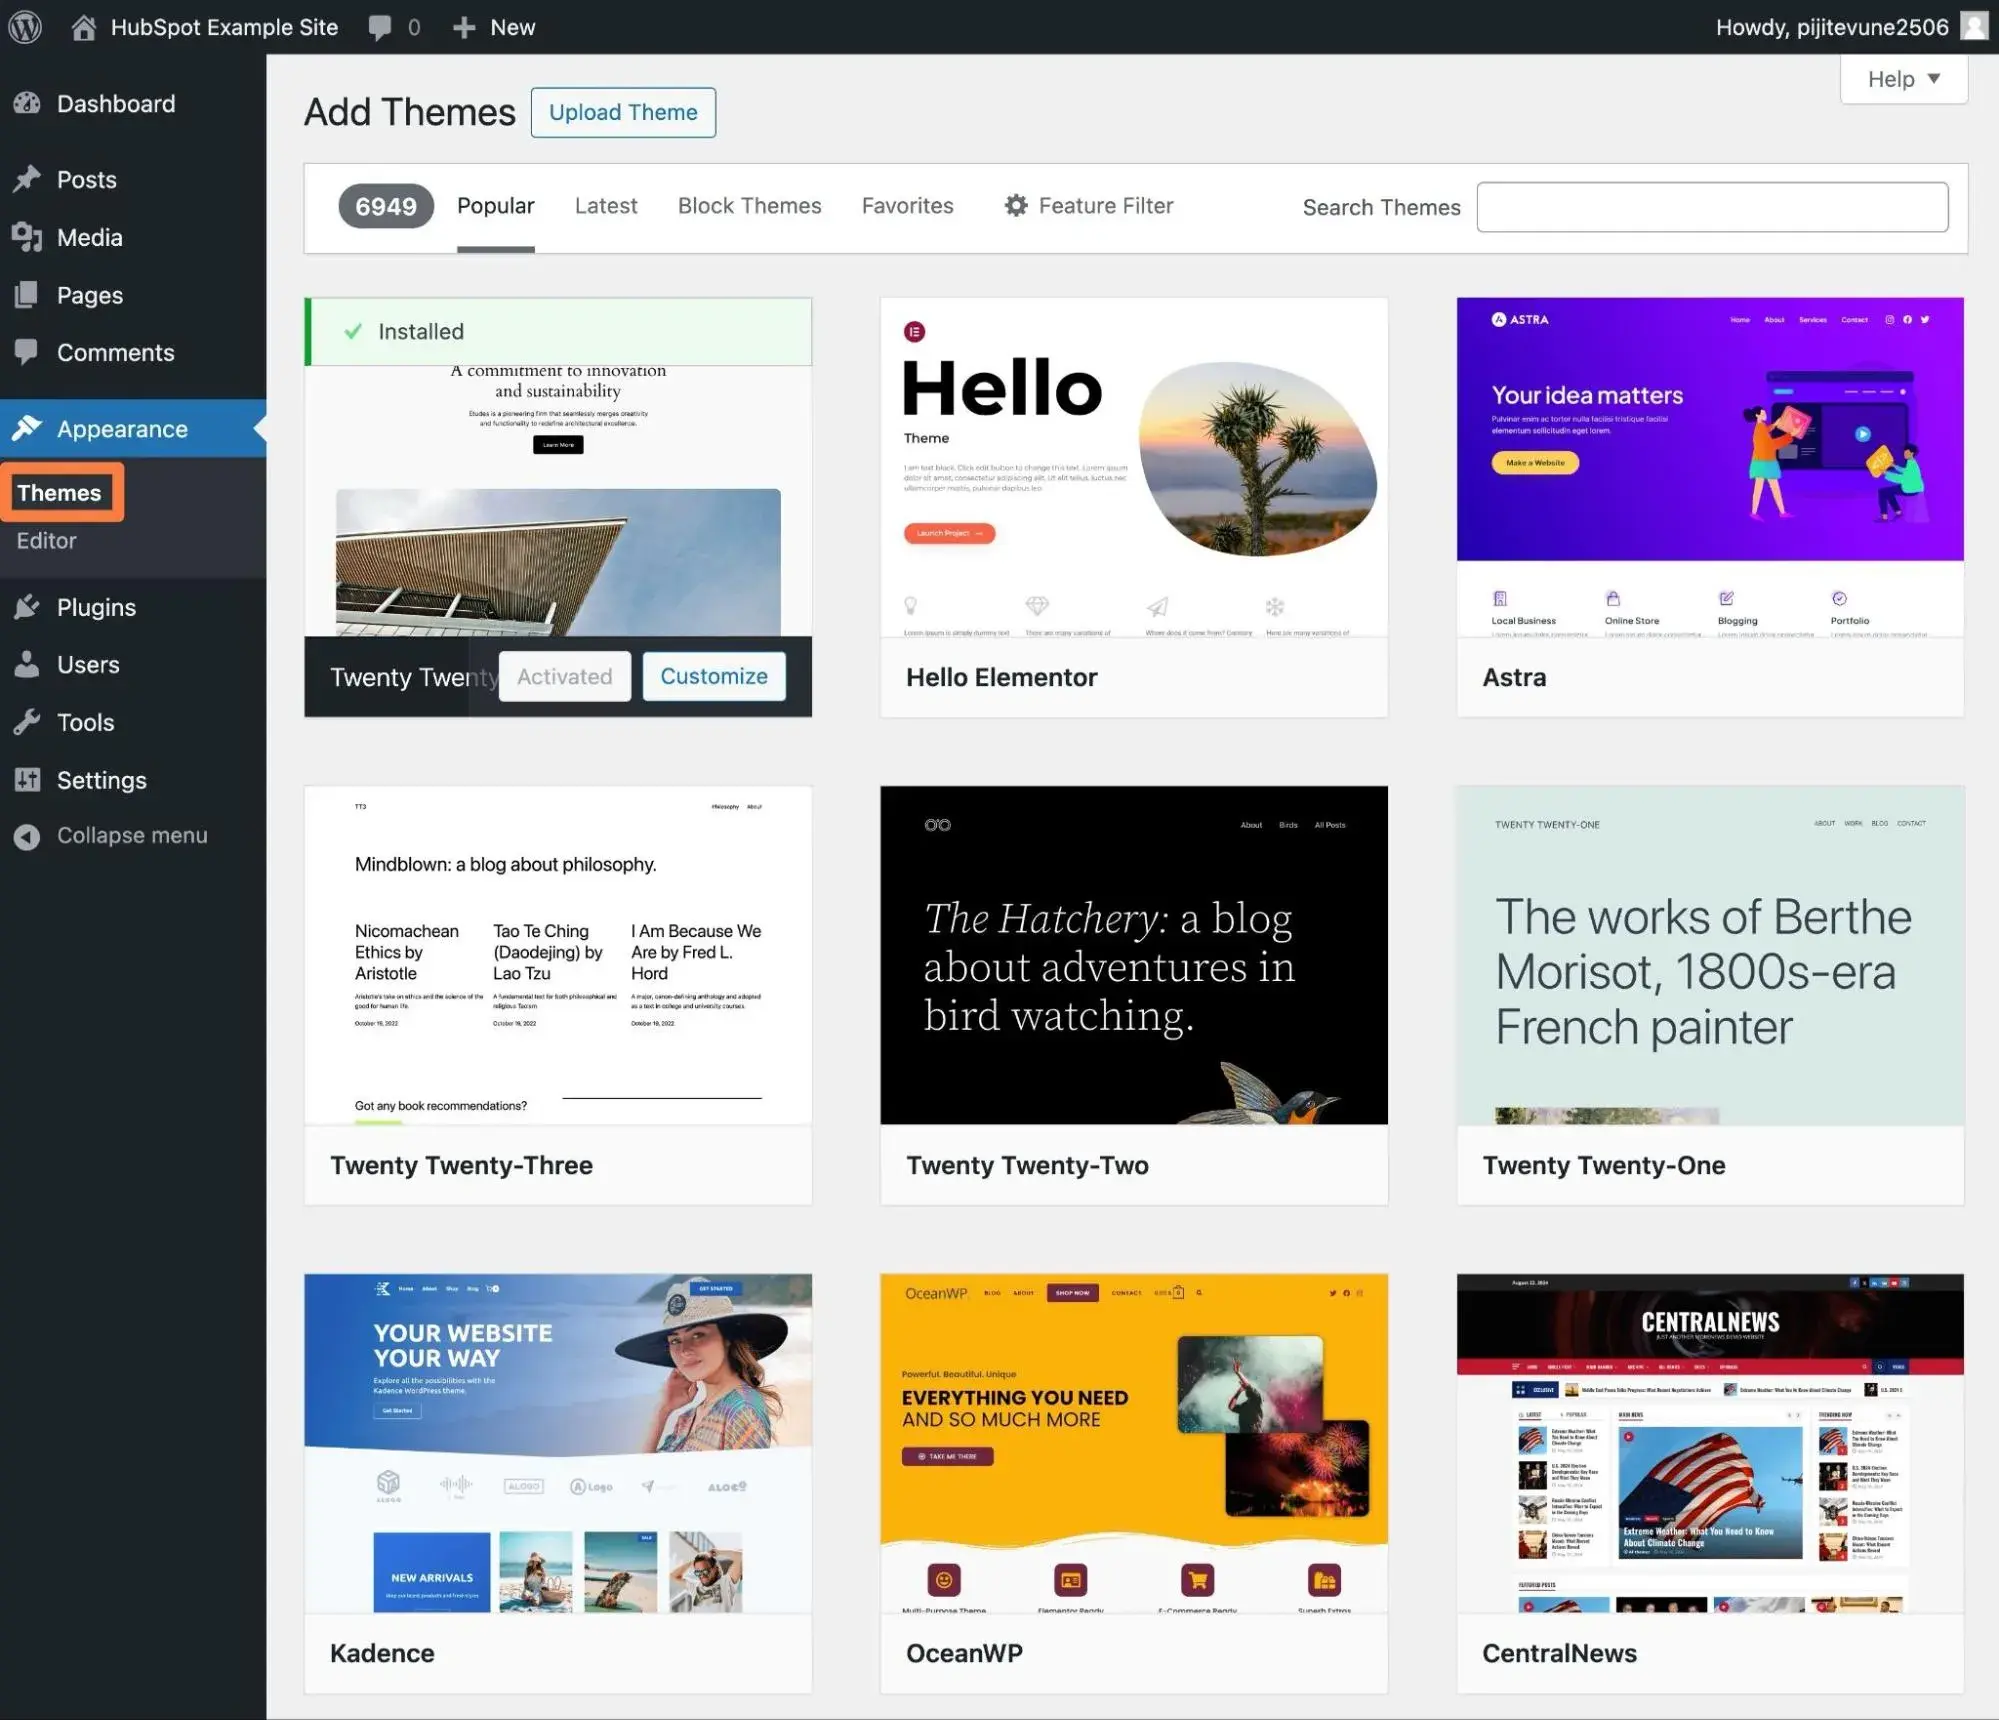
If you’re interested in selecting a free theme from the WordPress directory, just click Appearance > Themes in your WordPress dashboard. Then, click Add New Theme. From there, you can look at different themes and install one with the click of a button.
Pro tip: If you're not sure which WordPress theme to choose, I recommend starting with a lightweight multipurpose theme like Astra, GeneratePress, Kadence, or Neve.
If you’re interested in premium themes, you can purchase them directly from the developer or via a premium marketplace like ThemeForest. Once you find a premium theme you like, download it and return to your WP dashboard.
You’ll follow the same steps but instead of clicking Add New, click Upload Theme. You’ll find the theme in a .zip file on your computer. Then click the Activate button.
Pro tip: You probably don't need to purchase a premium theme just to get started. I recommend beginning with one of the free themes that I mentioned above — you can always upgrade later on if you want more design options.
How to Migrate from Wix to WordPress
Once you‘ve set up your basic WordPress site, you’re ready to convert Wix to WordPress.
Unfortunately, because Wix doesn‘t make it easy to export your site’s content, you can't automate this entire process.
There used to be a tool named CMS2CMS that let you automatically migrate Wix to WordPress for a fee. However, CMS2CMS unfortunately shut down in 2023, and I wasn't able to find any similar alternative that fully automates the process.
Therefore, your only current option is to automate what you can and manually migrate the rest.
Moving your Wix posts is the easiest part of the process because you can do it automatically, for the most part. However, you'll need to manually migrate all of your Wix pages by copying and pasting the content to WordPress.
You'll also need to manually move your Wix images, though there are some WordPress plugins that can help with the process.
Let's go through the entire migration in more detail…
Step 1: Import your Wix posts using the RSS feed.
To begin, you’ll have to locate your RSS Feed. You can do so by adding /feed.xml to the end of your URL. So if your Wix site address is www.example.com, type in www.example.com/feed.xml.
Now that your RSS feed is open, right click anywhere on the page and select Save as. Make sure to change the file extension to .xml before saving it to your desktop.
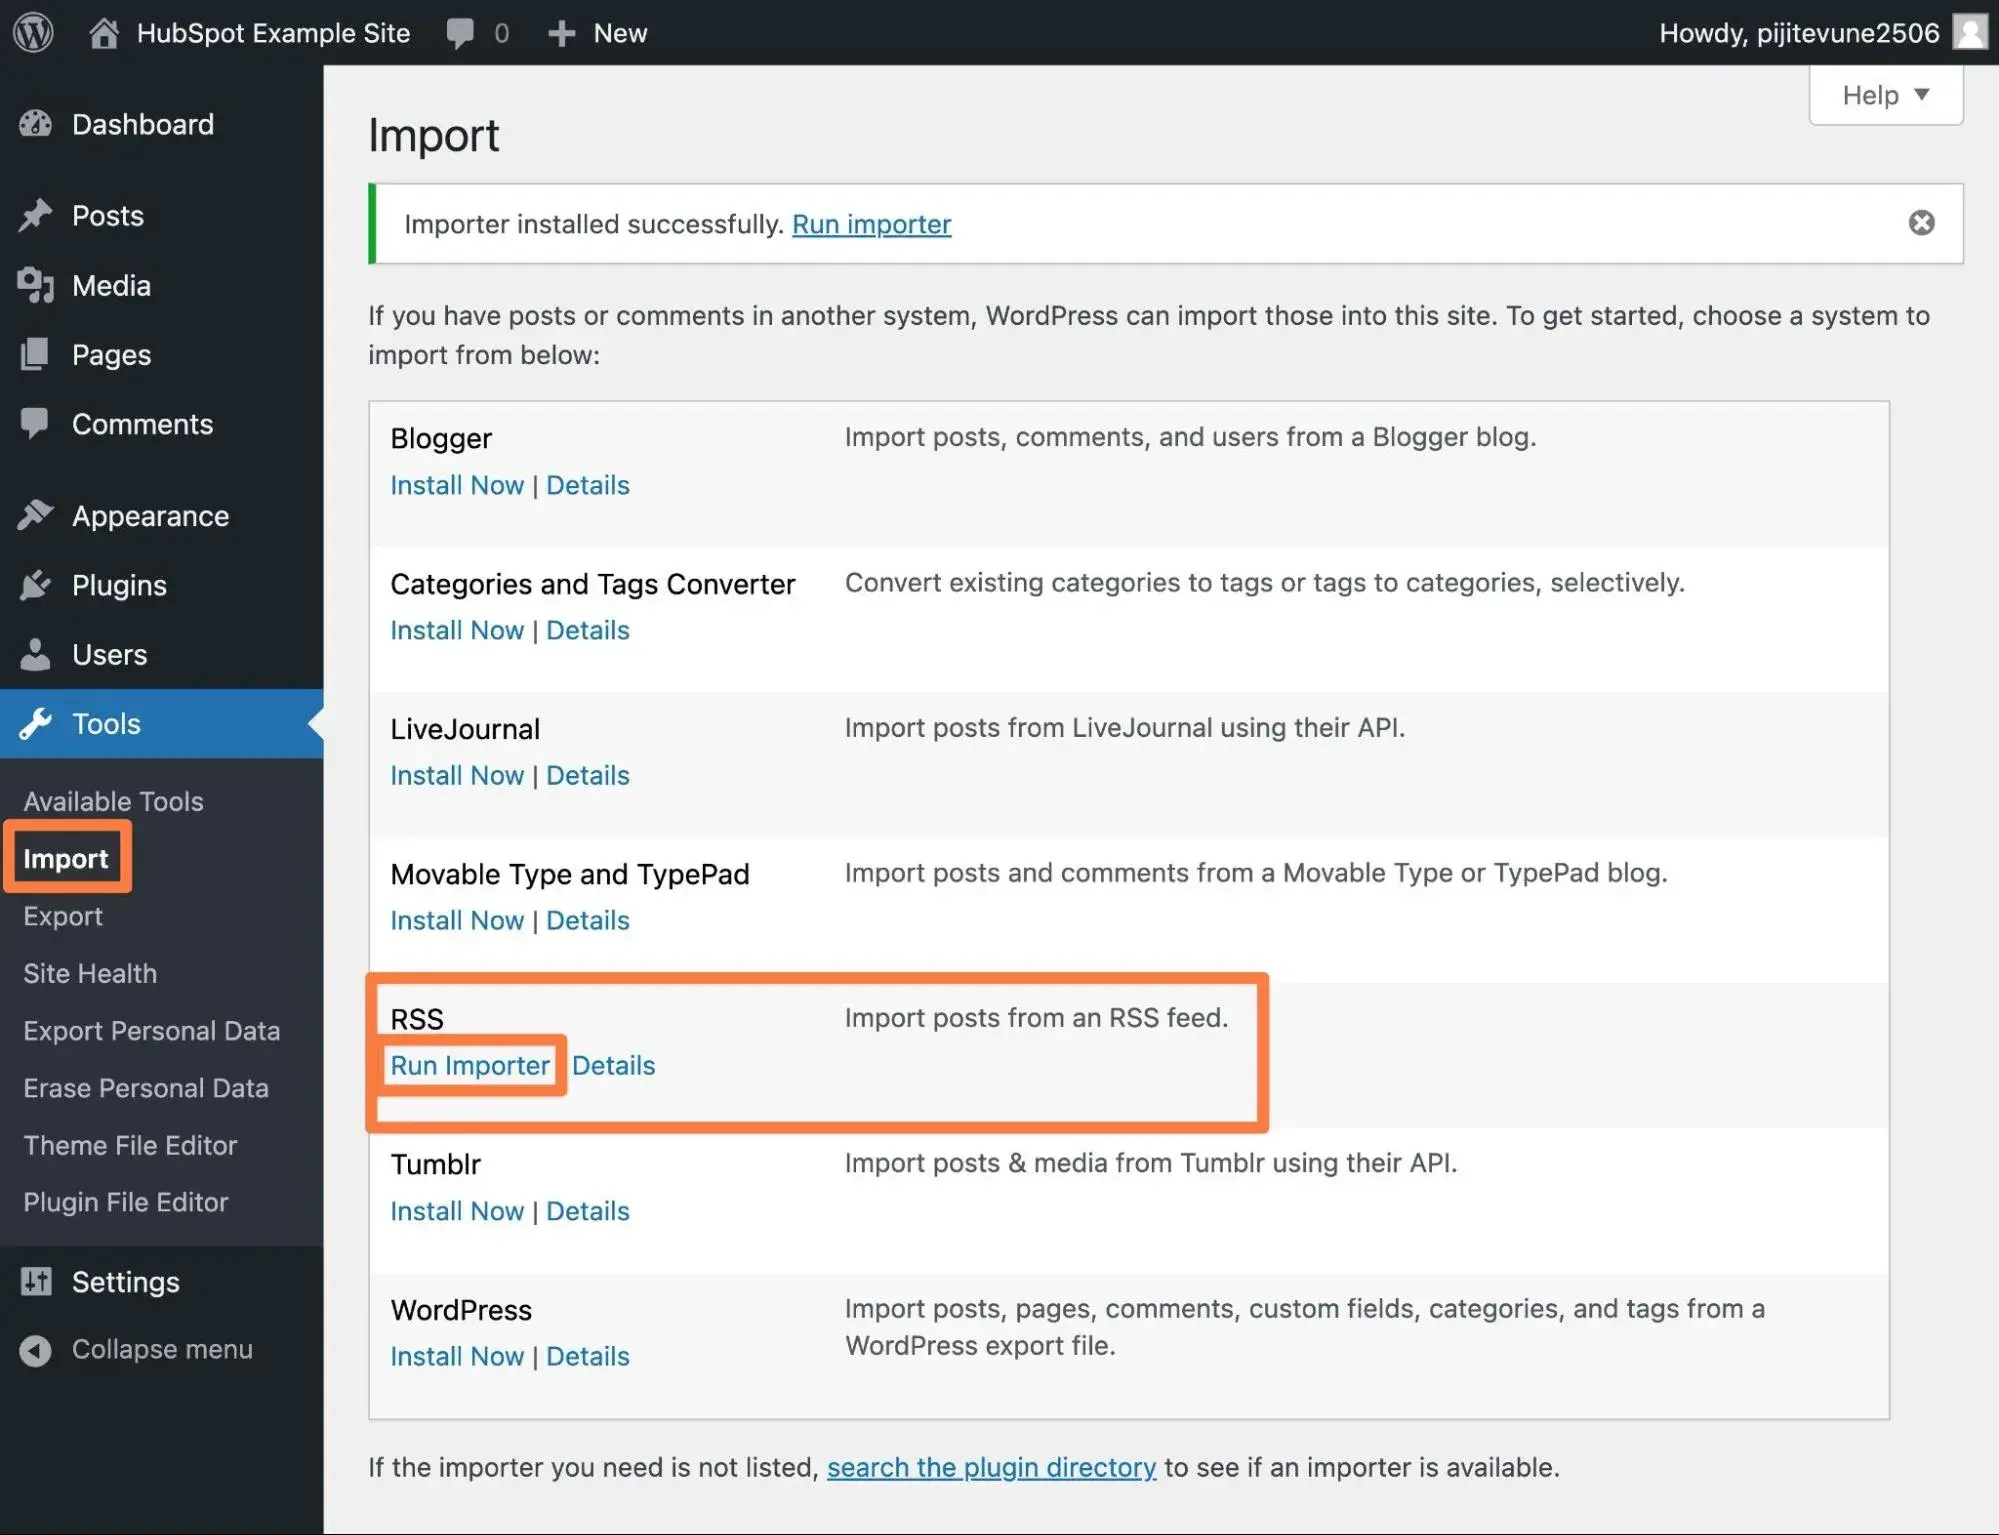
Now head over to your WordPress dashboard. On the left side of the screen, click Tools > Import. Scroll down to the RSS importer and click Install Now.
After you install it, you can then choose the option to Run Importer.
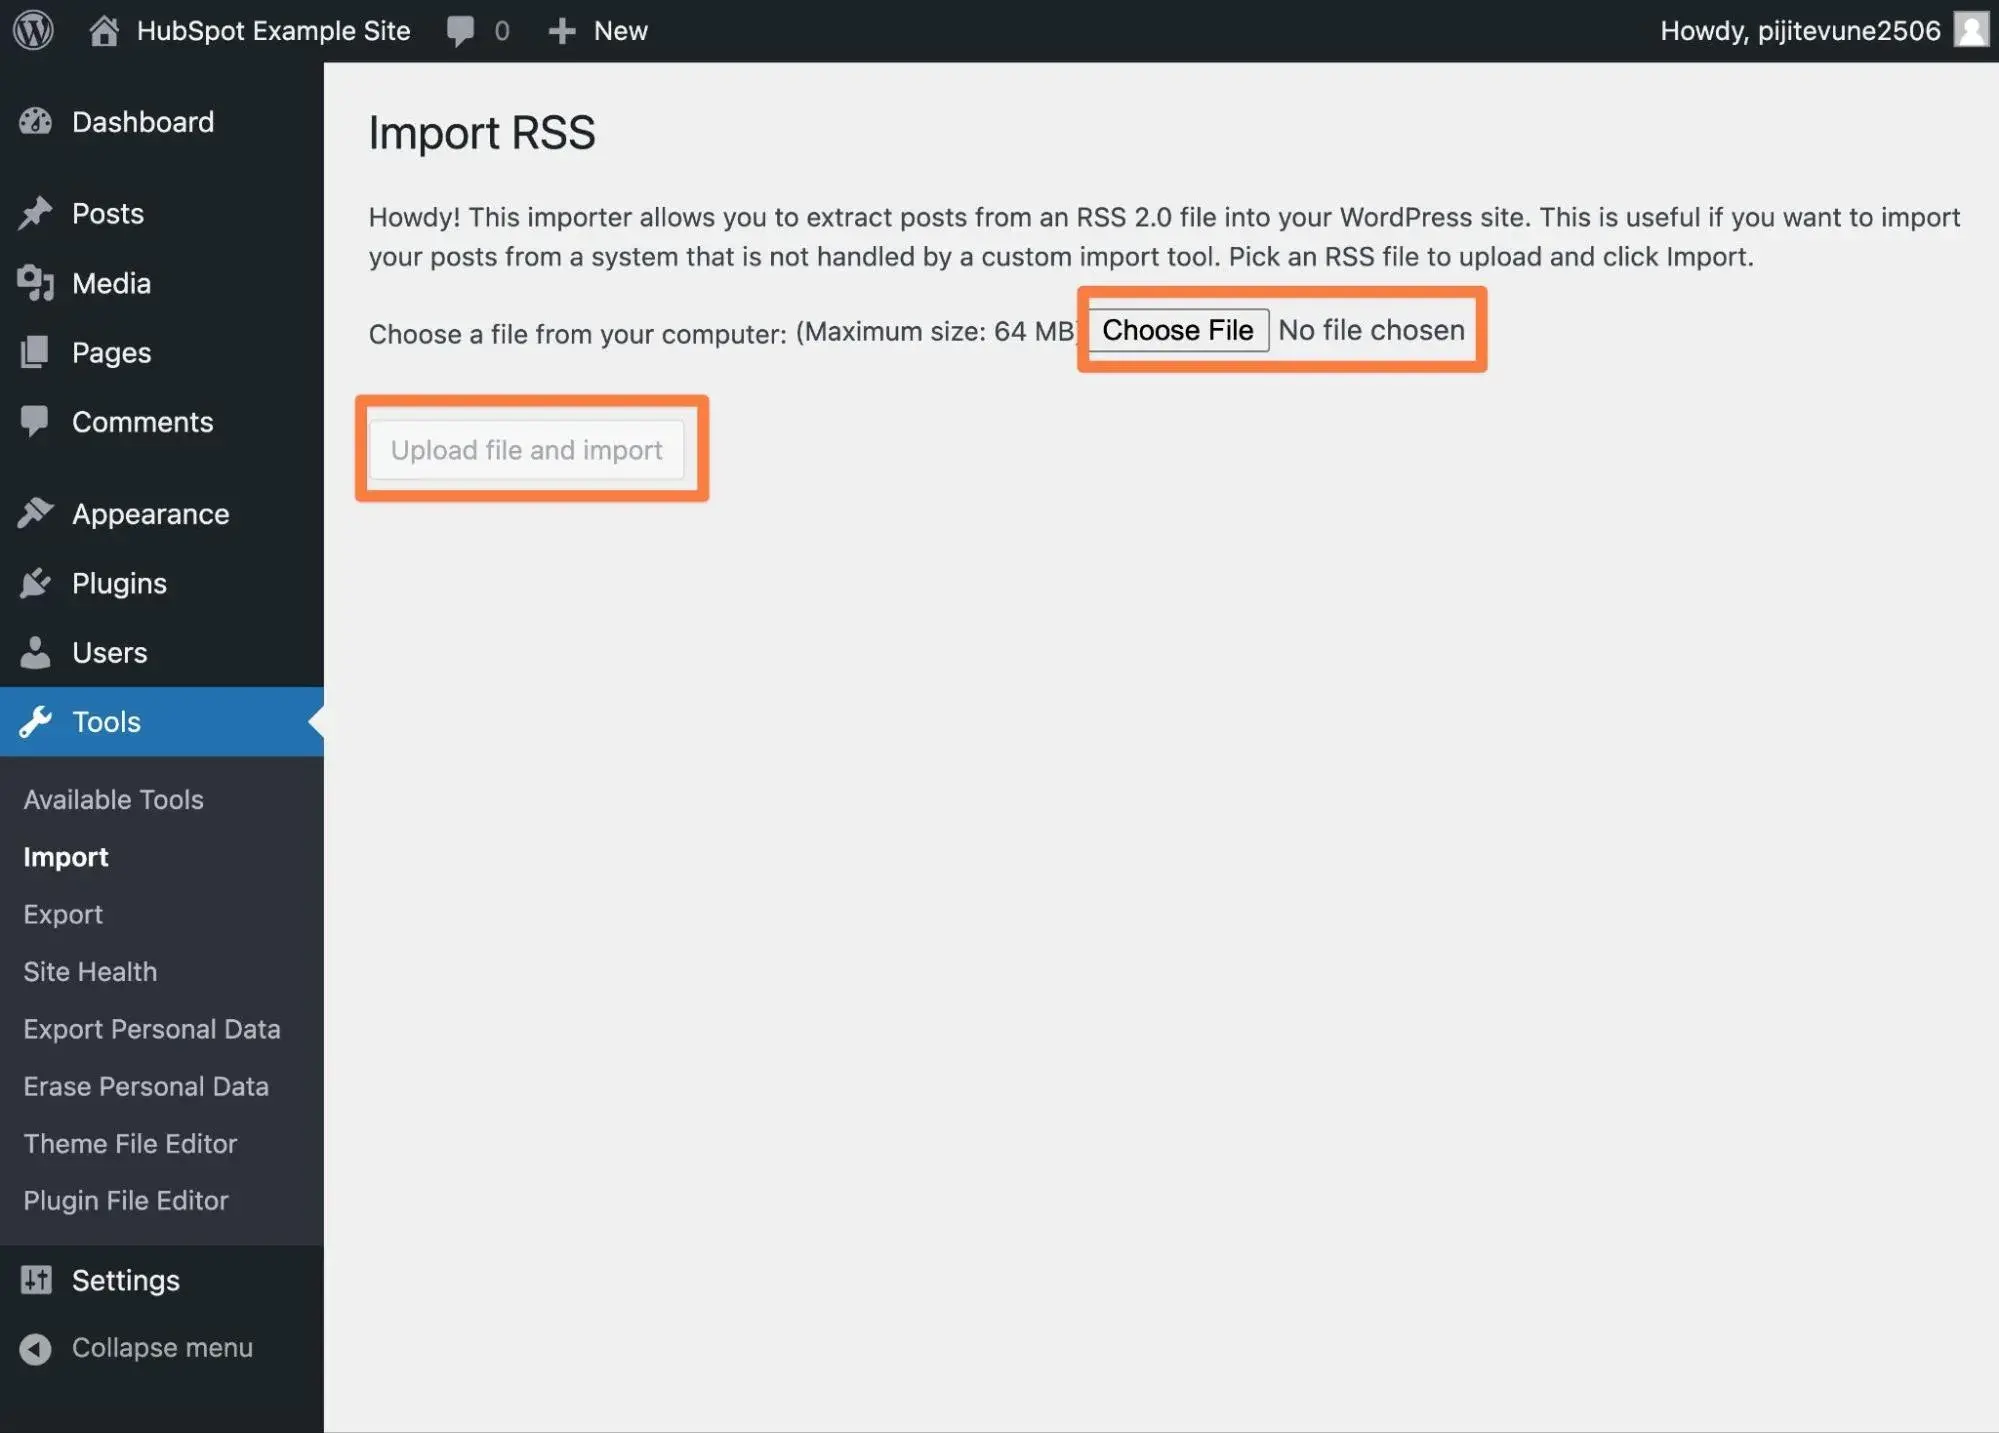
Click Choose File, then select the file from your desktop. Click the Upload file and import button.
Once the file has been successfully imported, you’ll want to ensure that all your posts are uploaded. Navigate to Posts > All Posts in your WordPress dashboard and scroll through the list. Besides some formatting issues you’ll need to clean up, all your posts should now be on your WordPress site.
Since the RSS migration only transfers your posts, you’ll have to import your pages and media separately. Let’s start with your pages.
Step 2: Manually import your Wix pages.
While you can automatically migrate your Wix posts using the RSS feed, you'll need to manually migrate the content of your Wix pages, which I know is a little annoying. You'll only need to do it once, though.
To begin, log in to your Wix dashboard, navigate to your pages, and begin copying.
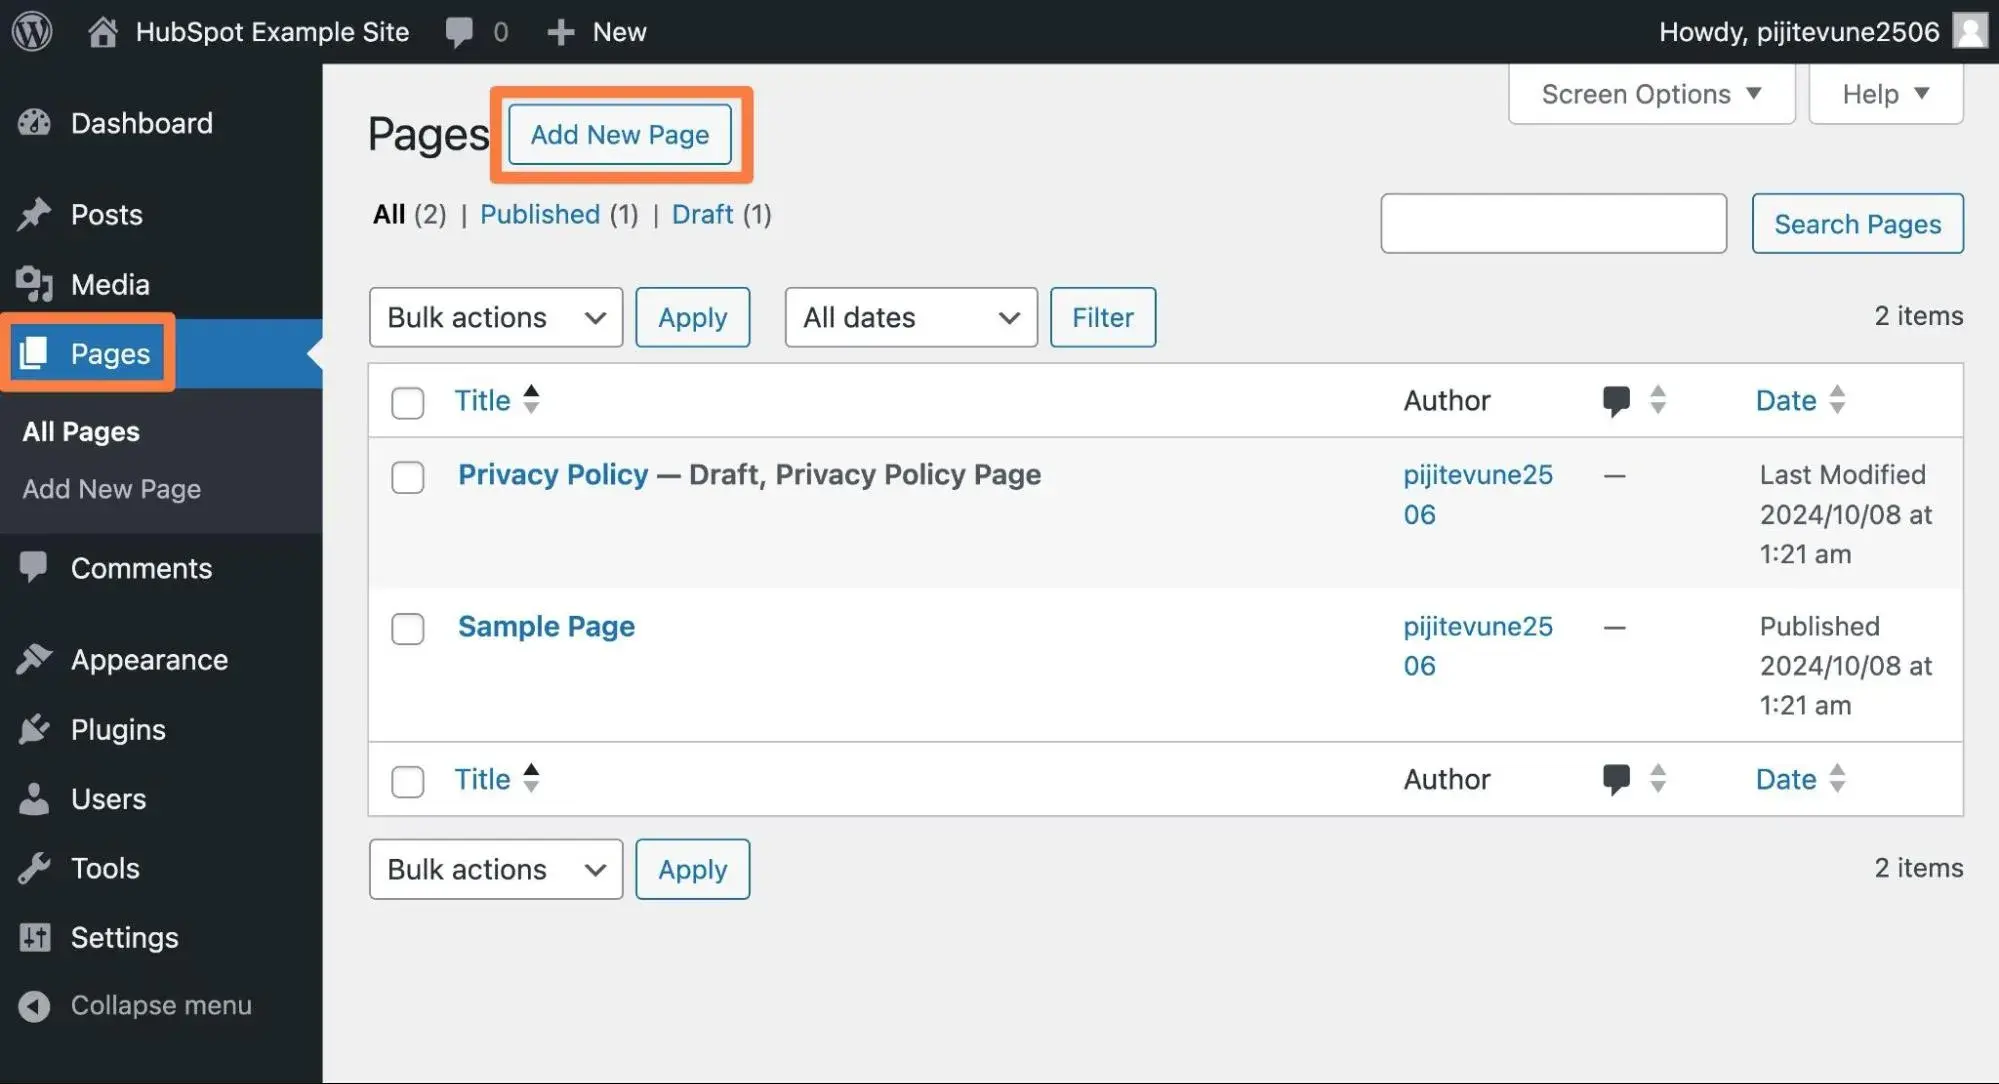
To add the copied content to WordPress, you can go to Pages > Add New Page and paste it in.
If you want to add formatting, you can use the WordPress block editor. You can check out our guide to the block editor to learn more about how it works, along with our introduction to WordPress blocks. I think understanding blocks is important for building your pages in WordPress.
Repeat this process until all your pages are copied into WordPress. Now it’s time for your images.
Pro tip: If you have a ton of pages and find the migration process tedious, you might want to consider the WordPress.com Business plan. WordPress.com includes its own proprietary tool to migrate Wix to WordPress, which can simplify the process. To learn more about what WordPress.com is, I recommend reading our WordPress.com vs WordPress.org comparison.
Step 3: Import your Wix images.
You have two main options for transferring your images from Wix to WordPress.
Either way, you’ll have to download the images from your Wix site manually and save them to your computer. You can do this by opening the page on Wix and then right-clicking each image and saving it to your computer.
I know it‘s tedious, but this is the best way to do it if you don’t have a ton of images.
Once you've downloaded all the images to your computer, there are two ways that you can upload them to WordPress:
- You can then upload each one manually. To do so, click Media > Add New in your WordPress dashboard.
- You can bulk upload them via FTP, if you feel comfortable using FTP. You will need to register them with the WordPress Media Library, though, which you can learn about in this Kinsta post.
Pro tip: If you have so many images that manually downloading and uploading them is too time-consuming, you can try using the Auto Upload Images plugin instead. This plugin will try to automatically save all of the images used in your Wix posts to your WordPress site‘s server. However, the plugin hasn’t been updated for two years now, so I can't guarantee that it will continue to work in the future.
Step 4: Set up your WordPress navigation menu.
Once you've migrated all of your Wix pages, you can set up your WordPress navigation menu. Typically, this will be located at the top of your site, though the exact placement depends on your chosen WordPress theme.
To customize the menu in most WordPress themes, you can go to Appearance > Menus in your WordPress dashboard.
You can then control which pages to link to using the interface. WordPress should automatically detect every page that you added, which lets you easily add the page to the menu. You can also add custom links if needed and customize the link text of every menu item.
If you need some extra help here, we have an entire guide to WordPress navigation menus.
Step 5: Transfer domain from Wix to WordPress (or set up redirect).
Once you‘ve migrated all of your Wix content to WordPress, the last step is to transfer your domain name from Wix to WordPress (or set up a redirect if you’re changing domain names).
If you were using a free subdomain for your Wix website, then you’ll just have to purchase a custom domain from your new hosting provider. Unfortunately, there's no way to automatically redirect visitors from a free Wix subdomain to your new WordPress site, so I recommend just adding a link to your free Wix site.
However, if you had purchased a custom domain name from Wix, then you can transfer and register it on your new web hosting account. This will replace the temporary domain you set up for your WordPress site.
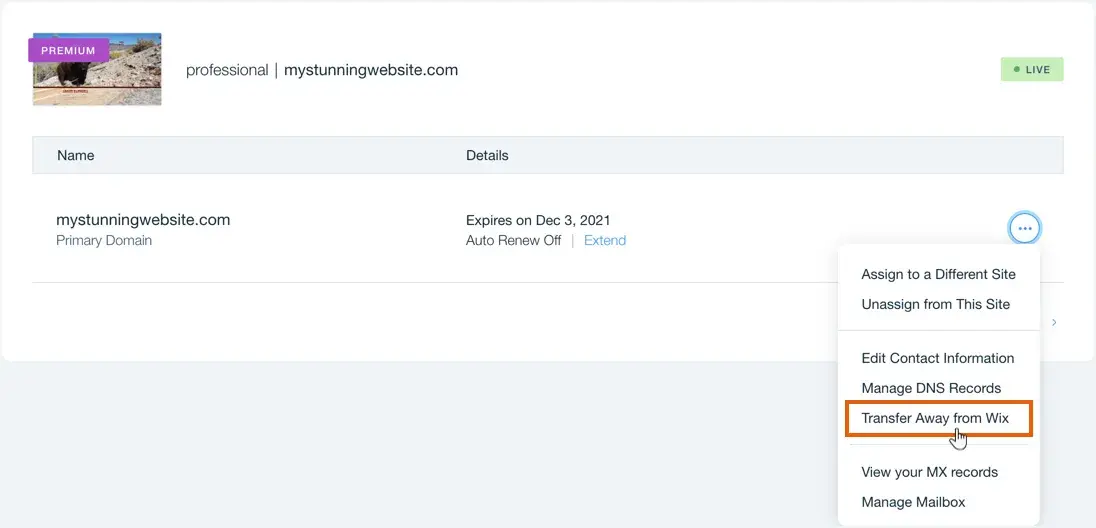
In your Wix account, just go to the Domains page. Scroll to your domain and click the Show More icon. Select Transfer Away from Wix.
Click Transfer Domain > I Still Want to Transfer. Wix will then email you a code which will authorize the domain transfer to your new registrar. Hold on to this.
You’ll now have to initiate the transfer process on your new web hosting account. Let’s take a look at the process on SiteGround below. Prices may vary depending on your hosting provider.
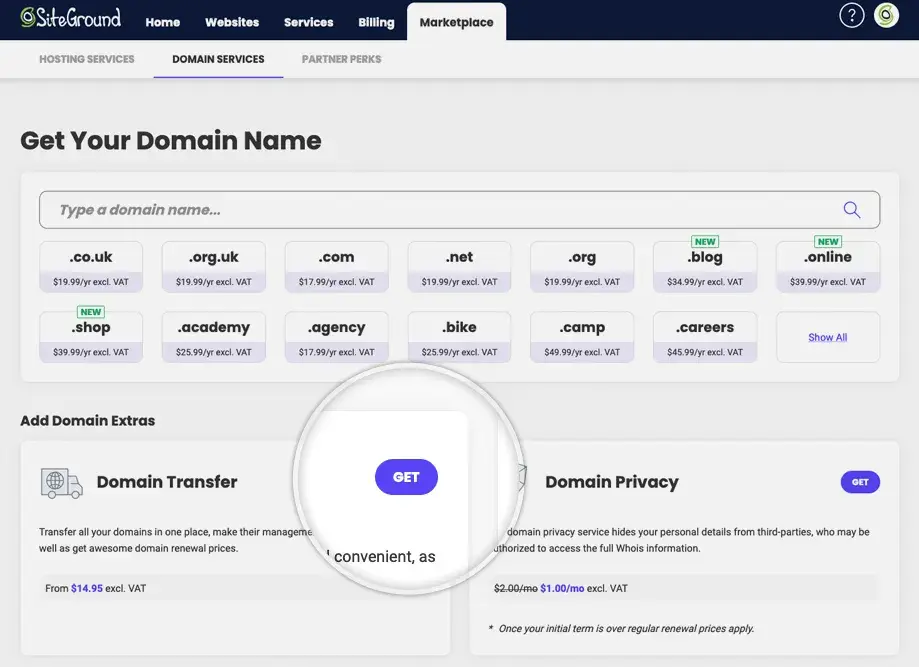
Log into your SiteGround hosting account. Go to the tab Add Services. Next to the box labeled “Domain Transfer,” click the Get button.
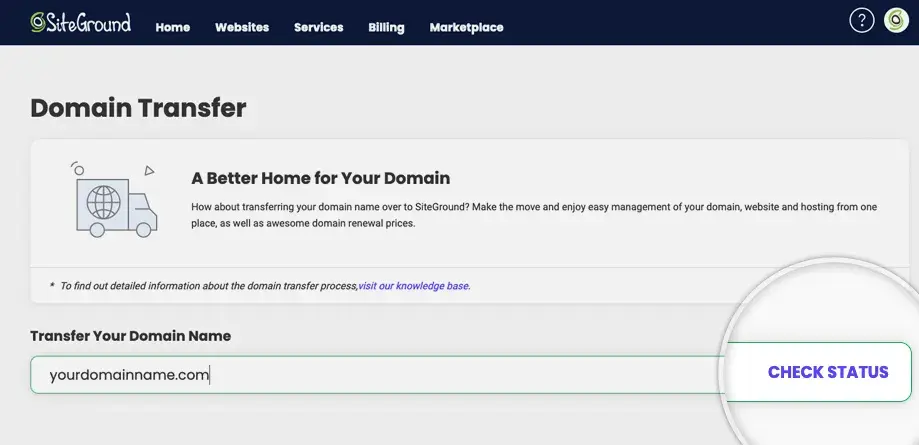
A pop-up window will appear. Enter your domain name in the empty fields and click Check Status.
Once your domain status has been approved, you’ll be asked to type in the code that Wix emailed you.
Then confirm that you have access to the administrative email address of your SiteGround account, and update the domain owner info if necessary. Once you’re ready, complete your purchase and the transfer will be automatically initiated.
You will be notified when the transfer is completed in a welcome email from SiteGround.
If you're changing domain names as part of the move, Wix also lets you set up redirects for your site. For example, if you're changing from mycoolsite.com to anevencoolersite.com, you would set up a redirect.
Pro tip: If you feel comfortable doing it, I recommend transferring your domain name to a dedicated domain registrar like Namecheap or Cloudflare Registrar instead of to your web host. Once you've done that, you can point your domain name to your WordPress site using nameservers or an A record.
This setup is a little more complex, but I personally prefer separating my domain name registration from my hosting provider. That way, if you ever want to switch WordPress hosts in the future, you won‘t need to worry about migrating your domain name again. If this sounds too complex to you, though, it’s totally fine to migrate your domain name directly to your WordPress host.
Start Your WordPress Journey Today
While Wix is a great option if you're looking for an easy way to set up a basic website, you might require more flexibility as your site grows and/or your feature needs change. In those cases, I think moving to WordPress can be a great choice.
While Wix doesn‘t make it as easy as some other website builders to migrate your site, you can get the job done with the help of your Wix site’s RSS feed and a little manual copy and pasting.
I won't lie — the migration process is a bit of a pain. But the great thing is that it‘s just a one-time thing. So once you put in the effort to transfer Wix to WordPress, you’ll be able to focus all your energy on getting the most from your new WordPress site.
Editor's note: This post was originally published in April 2020 and has been updated for comprehensiveness.
HubSpot's Free Website Builder
Create and customize your own business website with an easy drag-and-drop website builder.
- Build a website without any coding skills.
- Pre-built themes and templates.
- Built-in marketing tools and features.
- And more!
WordPress Website
![How to become a WordPress developer [+ tips from WCEU speaker Paul Bearne]](https://53.fs1.hubspotusercontent-na1.net/hubfs/53/59_How%20to%20Become%20a%20WordPress%20Developer.png)


