
How to Add Plugins to WordPress
There are three ways to install a WordPress plugin: directly from the dashboard, manually, and via File Transfer Protocol (FTP). The simplest way to add plugins is by searching for your desired plugin in your WordPress dashboard and installing with a click. The manual or FTP method is typically necessary for premium plugins and plugins not listed in the WordPress plugin directory. These two methods involve uploading a set files to your website from your local device.
How to Launch a WordPress Website
Learn how to launch a website on WordPress with this step-by-step guide and checklist. Learn how to...
- Set up your domain name.
- Install an SSL certificate.
- Analyze your content.
- Back up your site.
Download Free
All fields are required.
Form not available
How to Install WordPress Plugins
Let's review the three ways to install WordPress plugins, starting with the simplest: using the plugin search tool in your WordPress dashboard. (Note: You can update your plugins from the dashboard too.)
To add a plugin to your WordPress website from the dashboard:
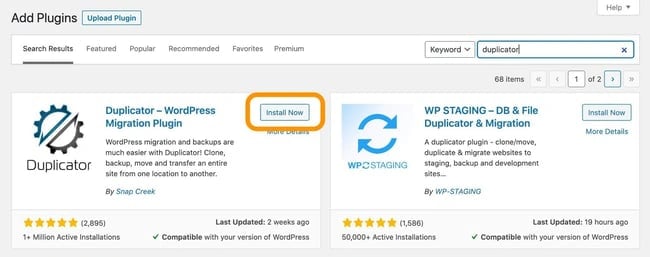
1. In your WordPress dashboard, choose Plugins > Add new.
2. Search for a plugin with the search bar in the top right corner. A number of results will appear.
3. After finding the plugin in the results, click Install Now. You can also click the plugin name to view more details about it.
4. To use the plugin, you’ll need to activate it. When the installation is finished (this usually takes a couple seconds), click Activate.
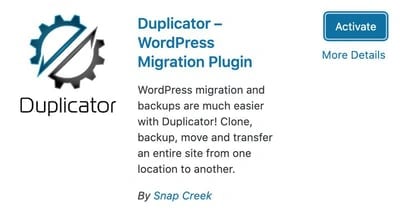
You can also activate or deactivate any plugin under Plugins > Installed Plugins.
For more help installing plugins with this method, here's a video tutorial from Yoast SEO:
To manually add a plugin to your WordPress website:
1. Download the desired plugin as a .zip file from either the WordPress directory or from a third-party source. If you’re downloading from a third-party website, make sure that the plugin developer is legitimate.
2. From your WordPress dashboard, choose Plugins > Add New.
3. Click Upload Plugin at the top of the page.

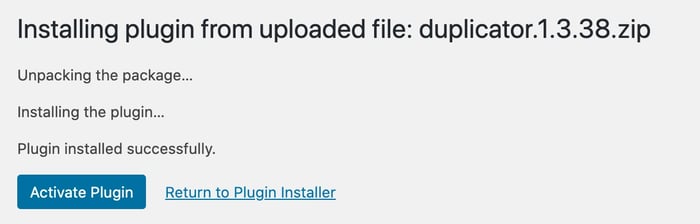
4. Click Choose File, locate the plugin .zip file, then click Install Now.

5. After the installation is complete, click Activate Plugin.
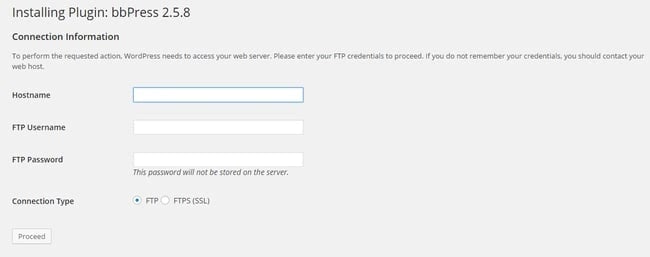
To add a plugin to your WordPress website via FTP:
1. Download the desired plugin as a .zip file from either the WordPress directory or a third-party source. If you’re downloading from a third-party website, ensure the service is legitimate.
2. Extract (or unzip) the plugin file. The unzipped folder will appear with the same name as the .zip file.
3. Next, you’ll need to connect to your WordPress website’s server with FTP. To do this, you can use an FTP client that connects to the host server to transfer files.
4. Once you open the FTP client, connect to your website with a username and password. You might need to obtain these credentials from your hosting provider.
5. In your WordPress file directory, open the wp-content folder, then open the plugins folder.
6. Upload the unzipped plugin folder that you downloaded to the plugins folder.
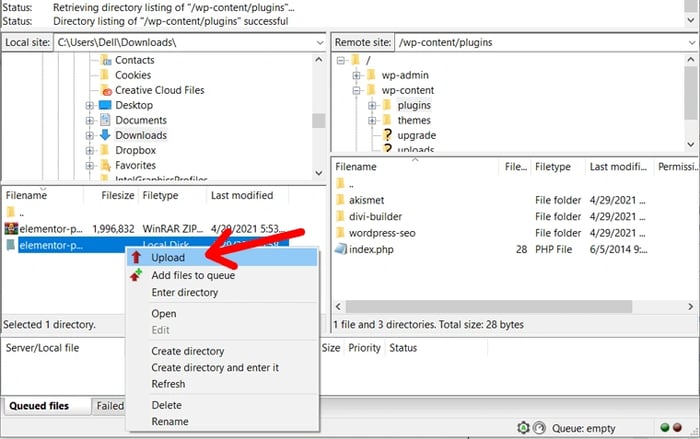
7. Return to your WordPress dashboard and select Plugins > Installed Plugins. Find your new plugin and click Activate.
How to Use a Plugin in WordPress
Most plugins that perform simple tasks begin working immediately after installation, but complex plugins with greater functionality may need some configuration from you.
For example, if you install a forms plugin, it will automatically offer you form templates once activated. Then you can customize your forms as you see fit. A more complex language translation plugin, on the other hand, will require some configuration before it starts working.
Some plugins may even bring you to setup wizards after activation to walk you through configuration steps.
The best way to view all of your plugin’s customization features is via the plugin admin page. In the dashboard, go to Plugins > Installed Plugins to view currently installed plugins, then click Settings under any of the plugins listed.
Next, let’s look at some popular plugins to make your WordPress website more functional for you and your audience.
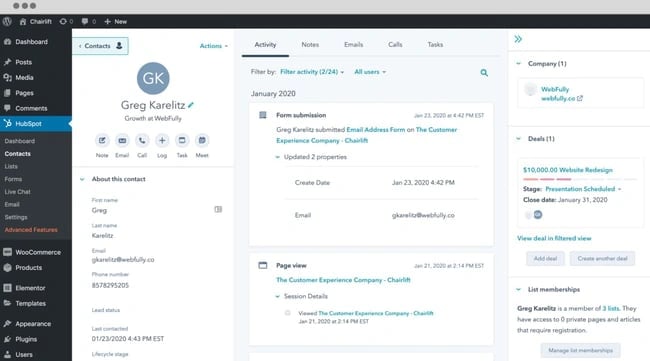
HubSpot WordPress Plugin
HubSpot’s free WordPress plugin allows you to create free forms, offer live chat support, organize lists for email marketing campaigns, manage your advertising, and analyze your website’s performance.
Are you a WooCommerce store owner? We also offer a HubSpot for WooCommerce plugin that lets you send WooCommerce data to HubSpot CRM, view in-depth ecommerce analytics, and tailor your email marketing campaigns to your unique customer base.
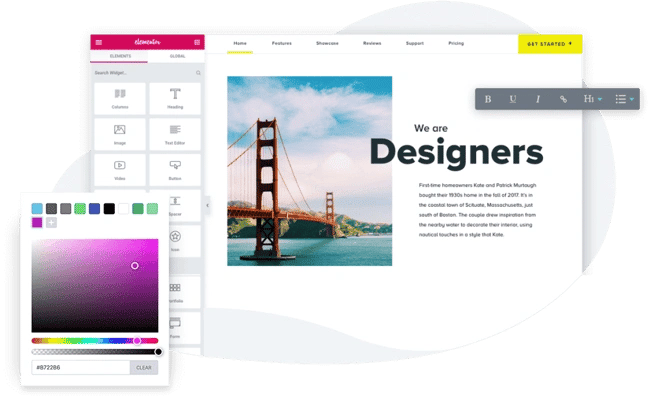
Elementor
Elementor is an excellent page builder plugin for crafting aesthetically-pleasing, branded WordPress websites. It offers tools to design all aspects of your web pages as well as a customizable form builder so you can easily engage with your clients. This makes it easy to create a completely unique WordPress site using Elementor.
If you're interested in taking advantage of this plugin, check out our course on building a WordPress website with Elementor.
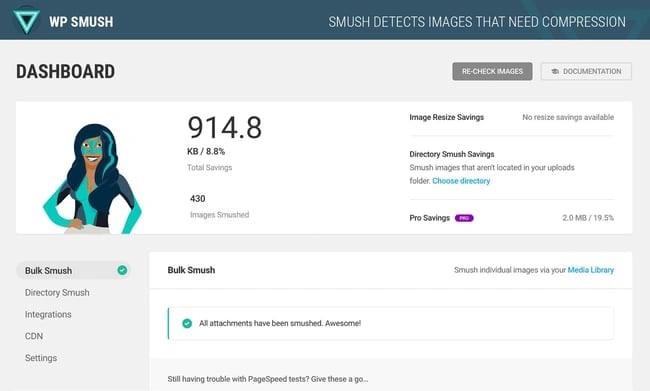
Smush
Smush is a plugin that will compress, lazy load, and resize your images automatically. Since oversized images have large files that aren’t optimized for the web, they have the potential to significantly slow down your site. Smush quickly detects and fixes images that are slowing your website down.
WordPress Plugin Installation FAQs
To wrap up, let’s go over some frequently asked questions related to installing, using, and uninstalling WordPress plugins on your site.
What are WordPress plugins?
A WordPress plugin is a piece of software that adds new functionality or extends existing functionality on a WordPress website. There are plugins for enhancing SEO, social sharing, and security, just to name a few.
Many WordPress plugins, including any plugin downloaded from the WordPress Plugin Directory, are free to use. There are also premium WordPress plugins available from third-party vendors. Free plugins often have the option to upgrade to a premium version that offers improved functionality.
Since anyone can create and distribute a WordPress plugin, plugins will vary in quality. For this reason, it’s important to research your options each time you want to install a new plugin, and check recommendation lists and plugin reviews to check for quality.
How do I find WordPress plugins?
There are almost 60,000 ready-to-install plugins in the WordPress Plugin directory (which you can search on the online site or in your dashboard), and premium plugins are available from third-party websites and marketplaces like CodeCanyon.
To narrow down your options, you can look for popular and well-reviewed plugins in the WordPress directory, or look at recommendation lists — our best WordPress plugins list is a great place to start.
What does activating a plugin mean?
When you install a WordPress plugin, you’re putting the plugin’s code files into your WordPress directory. However, the plugin will not work until you activate it. Activating a plugin can be thought of as “turning on” the plugin on your site.
You can also deactivate a plugin to stop the plugin from working on your site. This is helpful if you’re troubleshooting a problem, or if you need to temporarily disable a plugin to resolve some issue on your site. You can activate and deactivate plugins from the plugins admin page (Plugins > Installed Plugins).
How do I update a plugin?
Quality plugins will release updates every once in a while to keep up-to-date with WordPress core updates. When a plugin needs updating, you’ll see a notification in your dashboard next to the Updates tab. Click this tab to see the updates listed.
It’s possible to set plugins to update automatically or install updates manually — see our guide to updating WordPress plugins to learn how.
How many WordPress plugins should I install?
WordPress allows you to install as many plugins as you want, and there’s no set recommended number for how many plugins you should use. However, the more plugins you install, the more likely they are to impact your website’s performance.
This isn’t to say that more plugins equal a slower website. Rather, the quality of a plugin’s build is more likely to affect site speed. You could install a dozen high-quality plugins and experience no issues, then install one poorly coded plugin and see an immediate decrease in performance. Plugins may also interact in certain ways and affect your website negatively.
For these reasons, you should only install plugins when you need them, and delete any plugins you aren’t using. Additionally, when you do need a plugin, stick to well-reviewed options that receive frequent updates, and test each one after installing for compatibility with the rest of your site.
How to Launch a WordPress Website
Learn how to launch a website on WordPress with this step-by-step guide and checklist. Learn how to...
- Set up your domain name.
- Install an SSL certificate.
- Analyze your content.
- Back up your site.
Download Free
All fields are required.
Form not available
How do I uninstall a WordPress plugin?
To uninstall a WordPress plugin, go to your plugins admin page (Plugins > Installed Plugins). Under the plugin, click Deactivate if the plugin is currently activated, then click Delete.
Add Plugins to Improve Your Site
Plugins are essential for increasing the functionality of your WordPress website. They're quite simple to install, add, and use — follow the steps we’ve outlined above to get started using your newest plugins.
Editor's note: This post was originally published in October 2020 and has been updated for comprehensiveness.
WordPress Plugins