.webp)
Adding features where users can sign up, log in, and manage their profiles to your website can be done without writing a single line of code (unless you want to!).
I’ve built user account systems both ways: by coding everything from scratch and using platforms like WordPress, Wix, and Shopify. In this blog, I’ll show you how to implement the simpler approach.
Table of Contents
- Why create a website with user accounts?
- How to Make a Website With User Accounts and Profiles
- How to Create a Login Page for My Website
- End-to-end Testing of User Registration Flows
- Things You’ll Need to Make a Website With User Logins
- Alternative Way to Register Users on Your Website
HubSpot's Free Website Builder
Create and customize your own business website with an easy drag-and-drop website builder.
- Build a website without any coding skills.
- Pre-built themes and templates.
- Built-in marketing tools and features.
- And more!
Why create a website with user accounts?
For businesses today, significant benefits come with having a website that includes user accounts. These accounts serve as a powerful avenue for generating business growth and securing repeat customers, even for small business owners and solopreneurs.
The benefits aren’t just enjoyed by ecommerce businesses. Regardless of whether your site is community-based or a specialized platform, many rely on providing secure accounts for visitors.

With a user account, visitors create personalized profiles to tailor their experience. Accounts allow businesses to:
- Offer exclusive deals to individual customers.
- Build community engagement.
- Personalize content recommendations.
For example, I created an account with Lamborghini, and since then, I have been receiving updates about their cars, upcoming products, and community events. The updates remind me that I am part of a community. And in time, it has the potential of converting me, who was once casually scrolling through their website, into a customer.
I recommend implementing user accounts if your website:
- Offers paid products/services.
- Facilitates social/professional networking.
- Operates ecommerce stores (storing payments/orders).
- Provides exclusive content.
- Hosts public user-generated content (reviews/videos).
- Hosts private user content (cloud storage/notes).
- Seeks to build community engagement.
- Allows reactions (comments/ratings).
- Personalizes browsing experiences.
While many use cases exist, first analyze your business needs. Remember: Accounts should primarily enhance user experience. Ensure benefits justify the signup effort — no one should feel forced to create an account.
How to Make a Website With User Accounts and Profiles
- Log in to your CMS/website builder.
- Navigate to settings and enable user registration.
- Install/configure a membership plugin if needed.
- Create a registration form.
- Design a login page.
- Build an edit profile page.
- Thoroughly test the registration flow.
Let’s start with the universal blueprint. Based on my experience implementing auth systems across platforms, the seven steps above remain consistent.
Pro tip: Always test edge cases, password resets, email conflicts, and session timeouts. I’ve fixed these in over 17 client projects.
Now, let’s get platform-specific. For this guide, I’ll assume you have an existing website, but user accounts aren’t yet configured. Don’t have a site? I recommend specialized builders like Content Hub or MemberPress; see our best membership website builders comparison.
Fortunately, most modern CMS platforms handle membership functionality either natively or through extensions. A proper user system should deliver four core capabilities:
- Registration.
- Authentication (login/logout).
- Profile management.
- Content restriction.
Here’s how to implement user accounts on six major platforms: HubSpot’s Content Hub, WordPress, Joomla, Wix, Drupal, and Shopify.
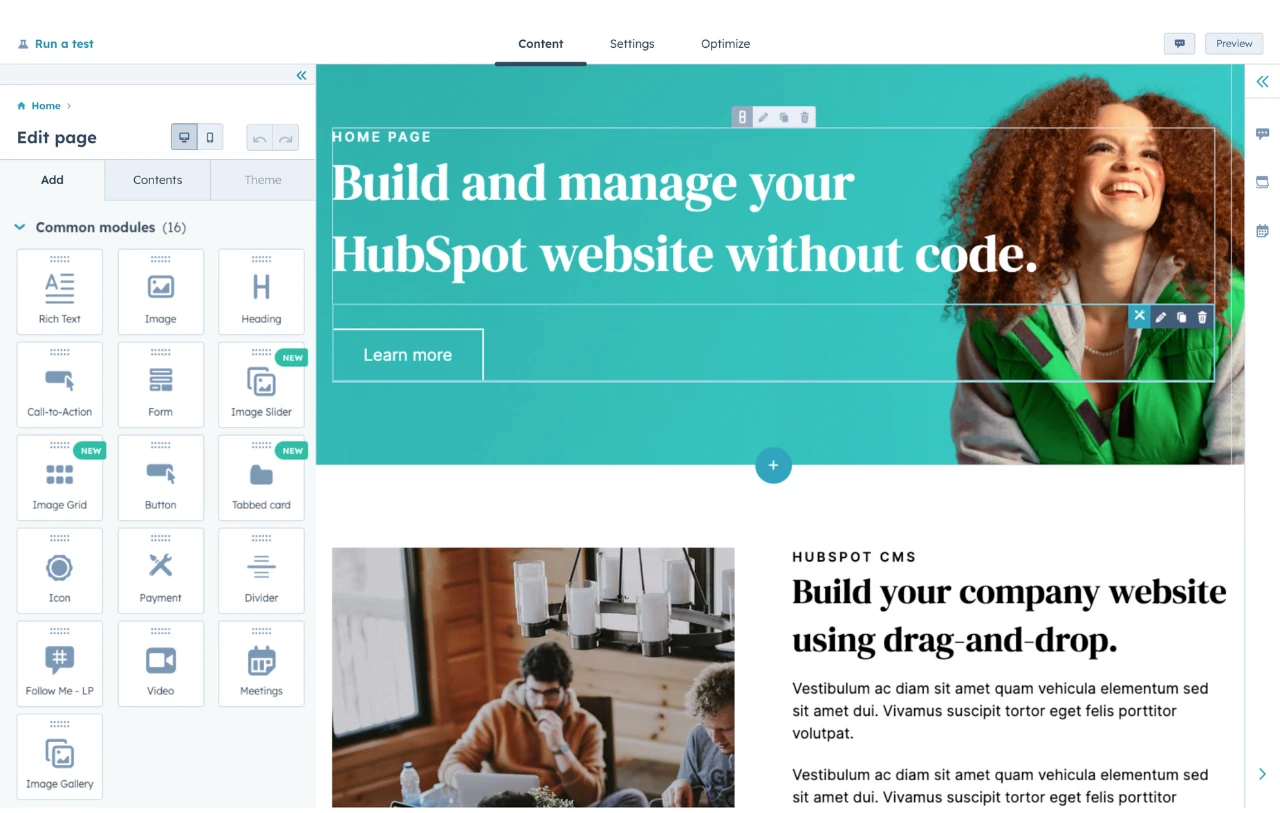
1. Content Hub
Content Hub is HubSpot’s content management system. It fully integrates with HubSpot CRM and its marketing, sales, and service tools.
You can restrict access to blog posts, landing pages, and website pages by contact list with an Enterprise account. Contacts on these lists will receive an email inviting them to register after a page has been restricted to specific lists. As a website operator, this is especially useful to me because it allows me to divide up user groups easily while working on projects.

Here’s how I can create a login page for my website in Content Hub.
- Navigate to content. Access “Website Pages” or “Landing Pages.”
- Select the desired page. Click on the content to restrict.
- Access settings. Go to the Settings tab.
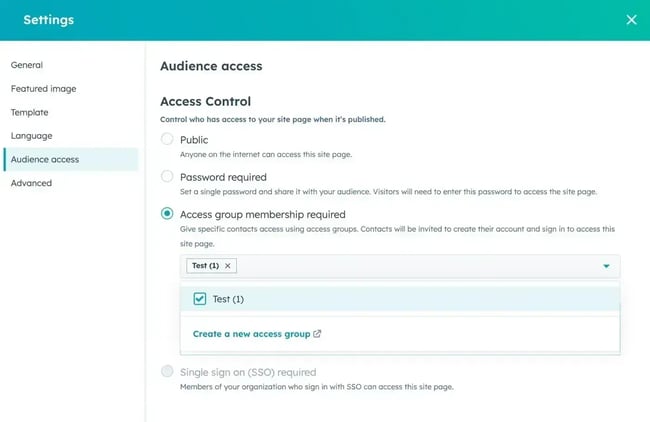
- Configure audience access. Under “Audience Access,” select “Access group membership required.”
- Choose access groups. Pick the groups permitted to access the content.
- Publish changes. Click “Update” to apply the settings.
This setup ensures that only specific user groups can access certain content, improving personalization and security.
See our knowledge base article on membership registration with Content Hub for a comprehensive guide on controlling user access on your blog and website powered by HubSpot.
2. WordPress
WordPress’s flexibility with plugins has always been a plus. For a membership site I managed, I explored several plugin options to find the best fit for the community and content needs. MemberPress stood out as an all-in-one solution, handling everything from payments and forums to performance tracking.
Ultimate Member was another strong contender, particularly effective for building online communities thanks to its highly customizable user profile features. I also considered ARMember, which offered a complete membership package that included content restriction and a built-in form builder.
These plugins might all have “member” in their names, but I suggest you consider how each plugin fits your business’s specific membership model.
For more WordPress plugin recommendations and some excellent examples of membership sites built with WordPress, see our guide to creating a WordPress membership site.
3. Joomla
Joomla gives user management and registration without third-party extensions. To activate user registration, I begin by opening the User Manager via the admin dashboard by navigating to Users > Manage. I then click on the Options button at the top right of the screen.
I go to the options panel and set “Allow User Registration” to Yes to enable visitors to register. I also set the activation method based on what is required.
The choices include self-activation, activation through email, or manual activation by an administrator. Having configured everything, I complete the process by clicking Save & Close to apply and save the changes.

I can also toggle how to confirm a new member through email confirmation or administrator approval. See Joomla’s user documentation for more detailed instructions on enabling user registration with Joomla.
4. Wix
One of the easiest options for user account management is Wix’s built-in Members Area, particularly if you need something easy to implement and simple to configure. I began by accessing the Wix Editor, going to Add > Members, and then clicking on Add Members Area.
With those pages set up, I did spend some time customizing them so they didn’t quite look like default templates. Making them match the theme and overall branding of the site made it all a little more user-friendly. Wix makes it easy to select which pages are member-only and has the option to create different roles, which is handy if you’re working with content levels or admin rights.
On the auth pages, I checked that the design matched the rest of the site. Finally, I went through the entire process from beginning to end, registering, logging in, and visiting the member-only pages, to confirm functionality.

For a comprehensive guide, visit Wix's support page.
5. Drupal
Drupal comes with a powerful user role and permissions system that’s ideal for managing accounts with varying levels of access. It allows me to create roles for different visitors. These roles grant different permissions for viewing and creating website content.

Drupal creates three roles by default:
- Anonymous user, a visitor who has not logged in.
- Authenticated user, a visitor who is logged in.
- Administrator, someone with control over website functionality.
In Drupal Core, I can also add roles specific to visitors to my website and assign permissions to these roles.
Ultimately, the types of roles you choose depend on your company’s team structure, but I appreciate the flexibility.
Here’s how I configure who can create accounts on my Drupal site and customize the registration and cancellation processes:
- I choose Configuration after opening the Manage menu.
- After that, I choose People, followed by Account Settings.
- I then see my alternatives by opening the Registration and Cancellation tab.
- Under "Who can register accounts?" I choose Visitors.
- When a visitor establishes an account, I finally check the box that says, “Require email verification.”

While Drupal handles the basics well, advanced membership functionality often depends on third-party modules. I’ve found that options like Membership, Drupal Commerce, and Rules give you better control over subscriptions, payments, etc. Installation is straightforward if you follow Drupal’s official module guidelines.
HubSpot's Free Website Builder
Create and customize your own business website with an easy drag-and-drop website builder.
- Build a website without any coding skills.
- Pre-built themes and templates.
- Built-in marketing tools and features.
- And more!
6. Shopify
Shopify offers two types of customer accounts: Classic and New.
Classic accounts use the traditional email-and-password login and offer more flexibility for customizing the account page.
The new customer accounts, on the other hand, allow passwordless login through one-time codes sent via email or SMS. This improves security and streamlines the user experience. To set up either, I go to Settings > Customer Accounts in the admin panel, choose between Classic or New, and decide if accounts should be optional or required at checkout. I also customize the account pages to match the site’s branding.

See Shopify’s help page for more help editing customer account settings on your Shopify site, including how to change your site settings on a mobile device.
How to Create a Login Page for My Website
The next step is creating the registration form so that users can create a user account by filling in their basic information.
A basic login or sign-up form usually has two input fields: one, a unique identifier (this could be an email address or a user’s name), and two, a means of authentication, usually a password or a passcode, just like we have in the image below.

After the form is created, the next step is creating the login or sign-in page so users can input that information.
To do all this, here are some general steps you must take if you are working with a CMS or website builder.
1. Create a login form using a form builder.
Most modern website builders and content management systems now have a built-in form builder, while some still require the use of a plugin. Regardless of the way you choose to build your login form, here are some things you should keep in mind.
- Accept multiple identifiers (email, phone number, or username).
- Add a prominent “Forgot password?” link.
- Implement Caps Lock detection with clear warnings.
- Enable social media sign-in options.
- Ensure full mobile responsiveness.
From experience, these small details significantly reduce abandoned registrations.
2. Create a login page.
The next step to have a login is creating a login page, which will host the login form.
When creating this page, try as much as possible to keep it clean and distraction-free. From experience, a well-designed login page has the power to increase conversion. I always match button colors to brand palettes and use consistent typography.
For inspiration, you can take a look at the various login template pages on Dribbble. Here’s just one of the hundreds of examples:


3. Embed the login form on the login page.
Now that my login page exists, I embed the actual form. With modern CMS platforms like HubSpot, this takes just minutes; no coding is needed. Here’s how I do it directly in HubSpot’s Content Hub:
- In my HubSpot account, I navigate to my landing pages or website pages.
- I hover over the login page I just created and click Edit.
- In the page editor, I click the form module.
- On the Options tab in the left panel, I select Login Form from the Choose a form dropdown menu.
While their free forms work instantly, I always verify the authentication method in Settings > Authentication. For basic sites, HubSpot’s native auth suffices, but for custom apps, I often connect it to our backend.
Create HubSpot Forms For Your Website (For Free)
After light customization (labels, colors, error messages), I get a clean, functional login like HubSpot’s own interface, ready to capture first logins.

End-to-end Testing of User Registration Flows
Begin by creating test accounts simulating how real-world users would interact with your site. This identifies issues that are not visible while developing. If you have an already launched site, attempt to put it into maintenance mode or use a staging environment to keep it from interfering with real-world users until you’re ready.
I recommend testing the following aspects.
Email Confirmation Verification
- Send a confirmation email to the users upon registration.
- Assure that the email is delivered by the deadline.
- Content: Make sure that there is appropriate information and branding on the email.
- Functionality: Test the confirmation link to check that it properly activates the account.

Testing tools like MailHog or Mailosaur can assist in capturing and inspecting outgoing emails during testing phases.
Password Reset Process
Fully verify the password reset functionality.
- Request process. Start a password reset and make the process simple.
- Email delivery. Check for actual receipt of the reset email and that it includes appropriate information.
- Link validity. Verify that the reset link is functioning and that there is an expiration after a predetermined time for security.
- Provision of user feedback. Provide proper feedback to users throughout the procedure, especially on error or link expiration conditions.
Member Area Functionality
Evaluate the member area to ensure it meets user needs.
- Accessibility. Navigation to and within the member area must be easy for users.
- Functions. Test functionalities like viewing customer orders, editing user profiles, and updating payment methods.
- Mobile responsiveness. Ensure that the member’s area is built for different device screens.
Private Membership Site
If your website has original content:
- Access control. Make sure that limited content is accessed only by authorized personnel.
- Search engine exclusion. Use appropriate meta tags or robots.txt files to keep search engine crawlers from searching exclusive content.
- Direct prevention of access. Prevent end-users from accessing privileged content through direct links without authorization.
Privacy Statement and Terms of Service
The user must be offered clear privacy policies and user terms for their registration.
- Visibility. Make sure these documents are available at the time of registration.
- Compliance. Make sure that your policies are in line with applicable legislation, like GDPR.
- Acknowledgement. Provide an option for user acknowledgement and acceptance of such conditions on sign-up.
SSL Certificate Implementation
Security is paramount.
- SSL certificate. Your site must include a valid SSL certificate, having a ‘https://’ and a padlock icon on browsers.
- Data protection. SSL secures data between your server and the user’s browser to protect important information.
- User trust. A secure connection gives users trust and is a strong factor in whether users register or not.

Things You’ll Need to Make a Website With User Logins
Now that I’ve covered how to set up user accounts and profiles, how to create a login page, and how to test user accounts, let’s recap what you’ll need to make a website with user accounts and profiles.
- A CMS or website builder.
- A budget for user accounts and/or form plugins, if required.
- A theme that comes bundled or is compatible with a membership plugin if needed.
- A registration form and page.
- A login form and page.
- An edit profile form and page.
- Exclusive content offers.
- A privacy policy.
- An SSL certificate.
HubSpot's Free Website Builder
Create and customize your own business website with an easy drag-and-drop website builder.
- Build a website without any coding skills.
- Pre-built themes and templates.
- Built-in marketing tools and features.
- And more!
Alternative Way to Register Users on Your Website
User registration is very important for every web application. The choice of how to do it depends on your level of technical expertise, project needs, and user expectations. Four possible ways of doing user registration are given below, with each having a benefit and considerations.
1. Code your registration form.
Building a custom registration form provides full control over data handling and the user experience. It’s the perfect solution when:
- You need a custom user interface that will reflect your brand.
- You need to pull certain information outside of the general fields.
- You need to use custom error handling and validation.
That being said, creating the form is one thing. Another is managing the process of sending the form data somewhere in a useful format.
You might need the hand of an experienced developer to connect the custom form to a server and send the data to a database.
If you’d like to code your registration form, here’s how I code mine.
- First, I’ll set up the HTML elements needed.
- Next, I need to use CSS to put the design elements in place, like colors and spacing. You can add extra elements to customize the look of errors, hover effects on your “submit” button, and more. I also ensure the form is accessible, using proper labels and error handling to guide users through any mistakes.
- Finally, I’ll add some JavaScript to validate form fields and data submission.
Regarding security concerns, you should:
- Always encrypt data transmission using HTTPS.
- Apply SQL injection controls and cross-site scripting (XSS) controls.
- Implement safe password storage and hashing practices.
Although this approach is versatile, it needs good knowledge of web security and best development practices.
Here’s what all this looks like together in one form:
See the Pen register users HTML by HubSpot ( @hubspot ) on CodePen.
This method gives me a ton of flexibility but is a little time-consuming. For improved security, I always ensure data is sent securely using HTTPS.
If you’re concerned about using your code on a website and want to ensure everything works as it should, check out this free website grader tool.
2. Use a Google Connector for Single Sign-On (SSO).
Lots of websites let users sign in with Google. If a user already has a Google account, it saves them from creating a whole user profile just for your website.
Instead, they simply sign up and then sign in using an existing Gmail login. This is done through Google’s OAuth API.

You’ll need a Google Cloud Console account and use the Google+ API. Again, this method can be a little time-consuming and tricky to configure, but once the initial setup is done, I find it really easy to manage.
Step-by-Step Implementation
1. Set up a Google Cloud project.
- Go to the Google Cloud Console.
- Choose a new project or an existing project.
- Activate the “Google+ API” for your project.

2. After that, I’ll create my OAuth 2.0 credentials and use them to connect OAuth to my website. In this manner, when users sign up, they will be taken to their Google login screen and prompted to authenticate my app.
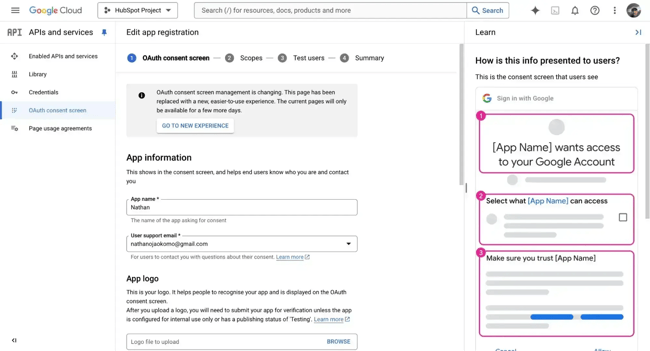
It’s crucial to remember that Google will request that I set up the consent screen and specify the parameters of my OAuth.
It all comes down to protecting user data and making sure that both Google and the user are aware of the extent of access required to a user’s account. Google’s OAuth 2.0 documentation has additional information about the various consent setups and scopes.
3. Next, I’ll get the Client ID and Client Secret (found on the credentials page when setting up OAuth). I’ll typically use a plugin on my website to configure everything there to simplify the process, usually the Nextend Social Login and Register plugin if I’m using a WordPress site.
You’ll need the Client ID and Client Secret from Cloud Console to configure the plugin. The benefit is that the plugin then handles all the backend processes of callbacks and authorization code exchange between my website and Google, allowing my site access to user data.
Regardless of which plugin you use, thoroughly test the sign-up and login process once setup is complete. I also ensure that users have the option to unlink their Google account from my site if they decide to stop using Single Sign-On.
Pro tip: If you’re having issues, make sure the redirect URL matches exactly between your OAuth plugin and your Cloud Console project. You’ll find this in the Credentials section. Also, always verify that your OAuth tokens are being securely stored and never exposed to unauthorized parties.
3. Integrate with social media logins.
Offering several social login options, such as Facebook or X, helps streamline the registration process.
Due to its large user base, Facebook is the social media site I use the most to persuade people to register. Offering both Google and social media authenticator options may be beneficial, depending on your target demographic.
The good news is that setting up a Google API for registrations is quite comparable to putting up Facebook as a login option.
Here are three easy steps you can use to integrate Facebook login:
- Create a Facebook app. Visit the Facebook Developers site. Set up a new app and configure basic settings.
- Configure Facebook login. Add “Facebook Login” as a product to your app and define valid OAuth redirect URIs, then set the appropriate permissions and scopes.
- Implement the SDK in your application.
- Include the Facebook JavaScript SDK in your web pages.
- Initialize the SDK with your App ID.
- Create login buttons and handle authentication responses.
Security tips: Verify the access tokens received. Handle errors and edge cases gracefully to improve user experience.
Benefits: Adding social authorization can increase registration rates by using users’ existing accounts.
4. Use a third-party account registration tool.
My preferred techniques for enrolling on a single website are the ones mentioned above. However, maintaining a distinct authentication procedure for every app and product you develop becomes extremely difficult and time-consuming.
A third-party tool with more powerful user registration and authentication features might be more appropriate in those situations.
Here are a few excellent examples:
- Auth0. An identity management solution that helps you centralize your registration process. I’ve used it in the past, and it has saved me from handling password storage, security compliance, and complex authentication flows.

- Firebase. A similar solution to Google that is free for up to 10 registrations a day and up to 50K monthly active users.
An example of when you need something like this is when you have a large volume of user registrations or registrations set up across multiple platforms and/or domains.
Grow your website with user profiles.
When working with clients to develop or enhance their websites, I sometimes have to persuade them of the value of user registration features. However, setting it up and keeping it up doesn’t have to be as difficult as you may imagine. Seeing how much it can enhance the user experience and business outcomes is always worthwhile.
Whether you’re managing an online store, creating a membership site to foster loyalty, or offering a hosting service to house user content, user accounts enable your visitors to remain interested in your premium features and content while also assisting you in monitoring your clientele as it grows. No matter the CMS, you’re covered.
Also, as your user base grows, having user profiles in place allows for valuable data collection, enabling you to refine marketing strategies and personalize user interactions. This not only enhances customer satisfaction but also opens doors to new revenue streams and opportunities for growth.
Editor's note: This post was originally published in June 2020 and has been updated for comprehensiveness.
HubSpot's Free Website Builder
Create and customize your own business website with an easy drag-and-drop website builder.
- Build a website without any coding skills.
- Pre-built themes and templates.
- Built-in marketing tools and features.
- And more!
Website Development


![How to build a Google Site that looks good and drives business [templates & examples]](https://53.fs1.hubspotusercontent-na1.net/hubfs/53/Website%20Redesign%20Terms.png)