.png?width=112&height=112&name=Image%20Hackathon%20%E2%80%93%20Horizontal%20(28).png)

Whether you’re part of a major brand, a small team, or it’s just you wearing all of the hats, without a centralized plan, things get messy fast.
But if the words “editorial calendar” make you itch, hear me out. This doesn’t have to add a dozen levels of complication to your process.
Whether you use HubSpot’s built-in marketing calendar or an option like Google Calendar, spreadsheets, or project management software — you can create an editorial calendar that fits your goals, needs, and brain without making yourself crazy. And I’m going to show you how.
Table of Contents
- How to Create an Editorial Calendar in Google Calendar
- How to Use Excel or Google Spreadsheets for Editorial Calendars
- How to Use Online Calendars for Editorial Calendars
- How to Use a Project Management Platform for Editorial Calendars
- Why Using Google Calendar as an Editorial Calendar Works
Follow Along With These Free Editorial Calendar Templates
.png)
Free Editorial Calendar Template
Start planning your editorial strategy with this free template.
- Plan your content strategy.
- Align your channels.
- Define your brand story.
- Measure your success.
Download Free
All fields are required.
Form not available
How to Create an Editorial Calendar
Before you whip out your paper calendar and start adding dates, let’s take a step back. Your editorial calendar is a schedule, but it represents so much more.
When I consult with businesses on how to develop a content strategy and what to include in an editorial calendar, dates are typically the last thing we consider. I like to start by reviewing upcoming goals and plans:
- What are our big picture goals or initiatives?
- What’s going on that we’ll need content for?
- What does our audience know already — and what do they need to know?
- Do we have existing content we can adapt?
- What do we need to create from scratch?
- How can we repurpose anything new?
If you’re reading this and thinking “I just need a structure that works for me,” or “None of that is relevant to me right now” — totally fine.
Most people don’t start with a full-fledged strategy-driven plan. But if you do have anything coming up or going on, the last thing you want is a last-minute scramble.
Once you’ve thought through the big picture, it’s time to start thinking about the content itself. Start by asking:
- What types of content is your audience interested in?
- Where do they hang out online?
- What types of content is your competition using, and how often?
- How often can you commit to creating something?
That last one is the clincher. If you only have bandwidth for one high-quality blog, podcast, or video — plan accordingly. If you put 4 on the calendar, you’re setting yourself up for failure — and if you’re like me, endless guilt.
Whatever your answers, they’ll give you a solid idea of what makes sense for your audience and your capacity.
Step 1: Choose your platforms.
If I ever got into the “Live. Love. Laugh” sign craze, I’d probably have one that says “You don’t have to be everywhere for everyone.”
You only need to show up where your audience hangs out and in a way that you enjoy. If you hate creating a specific type of content, you’re always going to put it off — or you’ll have to hire someone to do it for you. EIther way, it’s a big factor in how you plan content.
I recommend choosing a primary content type that fits with your natural strengths:
- Written (blog)
- Audio (podcast)
- Video (YouTube or Livestreams)
From there, you can repurpose as needed to different platforms. Since I’m most comfortable with the written word, that’s where I start, then adapt to email and LinkedIn.
If you show up best live, then start there and adapt to other content types. The only right way is the one that makes sense to you. Use that as the basis for your editorial calendar.
Step 2: Determine content guidelines and frequency.
This is where a lot of people get stuck — because they’re trying to match someone else’s pace.
Let me be extremely clear: most businesses do not need to publish three articles a week, two podcasts, and manage five social media platforms.
Larger ones with full-time content teams? Sure. But that’s not 90% of the companies out there. Not to mention that with AI making it easier to churn out mediocre content, quality matters more than ever.
Here’s what I ask clients (and myself) at this stage:
- What kind of content can you realistically create right now?
- What cadence feels sustainable for the next 90 days?
- What categories or themes matter most to your audience?
- What’s the goal behind each piece — awareness, engagement, sales?
For some people, one post a week is doable. For others, one per month or one per quarter feels best.
Whatever that is, we can work within the bounds of your bandwidth, but it’s so important to be honest with yourself here. Otherwise, you’ll just be overwhelmed.
Once you have a cadence in mind, think about the big-picture categories you can speak to, and your content goals. From there you can prioritize your ideas, focusing on the mission-critical stuff first, and the nice-to-have or lower priority content later.
Here are a few ways you could map out your content repurposing framework.
Blogging Weekly
- 1x week: Blog (Tuesdays).
- 2x week: Email (Tuesdays, Thursdays).
- 2x week: Instagram, Facebook, YouTube (Wednesdays, Fridays).
Blogging Monthly
- 1x month: Publish Blog (week 1)
- 1x week: Email
- 2x week: Instagram, Facebook, YouTube (Wednesdays, Fridays)
You can create and flesh out your editorial calendar using the above examples more easily. The less frequently you publish, just make sure every post is meaty enough tto support repurposing.
Step 3: Choose an editorial calendar platform.
Now that you’ve got a sense of what you’re creating, how often you’ll publish, and where it’s going — it’s time to decide where all of this planning will live.
The truth is, the “best” platform is the one you and your team will actually use. Fancy tools are great, but if they add friction or require too many clicks to see what’s going on, they won’t get used consistently. I’ve seen beautifully built project boards go completely stale because no one wanted to open or manage them.
The most popular options are spreadsheets, online calendars, or project management tools like Trello, Asana, or ClickUp. I’ve tried them all, and for most clients, a simple spreadsheet is the way to go.
Keep in mind: the more complex the organization and as quantity increases, a more complex tool may be needed.
No matter which format you choose, I recommend tracking the following basics:
- Publish date: When it goes live
- Due date: When the draft needs to be ready
- Title or topic: Working title is fine
- Assigned owner: Who’s responsible for delivery
- Call to action (CTA): What do you want the reader/viewer to do?
- Keywords (for SEO): So you knows what phrases to optimize for
- Status: Idea, drafting, editing, scheduled, live
- Links: To both the draft and final version for easy reference
You can always build from here. But keeping these core elements in your calendar makes it easier to track progress, spot bottlenecks, and repurpose content without digging through old folders.
How to Create an Editorial Calendar in Google Calendar
I’ve built editorial calendars in everything from fancy enterprise platforms to color-coded notebooks. But when it comes to simplicity, flexibility, and team visibility, Google Calendar still holds up nicely.
It’s free, it plays nicely with Gmail, and almost everyone already knows how to use it. Plus, you can layer it with other calendars (like launch schedules or social campaigns), share it with your team, and set reminders to stay on track — without adding a new tool to your stack.
Below, I’ll walk you through how to use Google Calendar to set up a content calendar that keeps you organized and focused — whether you’re a solo creator or working with a team.
We’ll be using a downloadable template to make the setup easier, but feel free to start from scratch if you’d rather build your own.
Step 1: Download HubSpot’s free editorial calendar templates.


First, download the calendar templates above (they’re free.) By doing this, you’ll have three editorial calendar templates on your computer (or in your Google Drive).
- Blog Editorial Calendar
- Social Media Calendar
- Content Planning Template
Here I’ll go over how to use the Google spreadsheet with Google Calendar. There are ways to upload the Excel version into Google Calendar — it just requires a few more steps.
Step 2: Customize your template and prepare it for import into Google Calendar.


With your Google Sheets calendar open, it’s time to make it work for your process.
It already includes these columns:
- Publish date: When the content will go live
- Due date: When the draft or final version needs to be ready
- Author: Who’s responsible for creating or finalizing the content
- Topic/Title: A working title or quick summary of the piece
- Content/Details: Notes, links, outlines, or context for the post
- Keywords: SEO phrases to include or focus on
- Target persona(s): Who the content is for (audience segment, buyer type, etc.)
- Offer/CTA: What action you want the reader to take, or what offer this content supports
This gives you a solid mix of strategic clarity and practical execution. You’ll know what’s going out, why it matters, who it’s for, and how it ties back to your larger business goals.
Don’t be afraid to tweak or hide columns you’re not using right now — but I recommend keeping them in your template at least as a “default” tab, so they’re easy to bring back when your content plans get more complex.
Once you’ve filled in a few important dates, it’s time to connect it with Google Calendar.
Step 3: Create a Google Calendar for your content plan.
Before you connect your editorial calendar to Google Calendar, you need a Google Calendar to sync to.
No brainer here, but don’t skip this step. Just go to Google Calendar > Other Calendars > Create New Calendar.

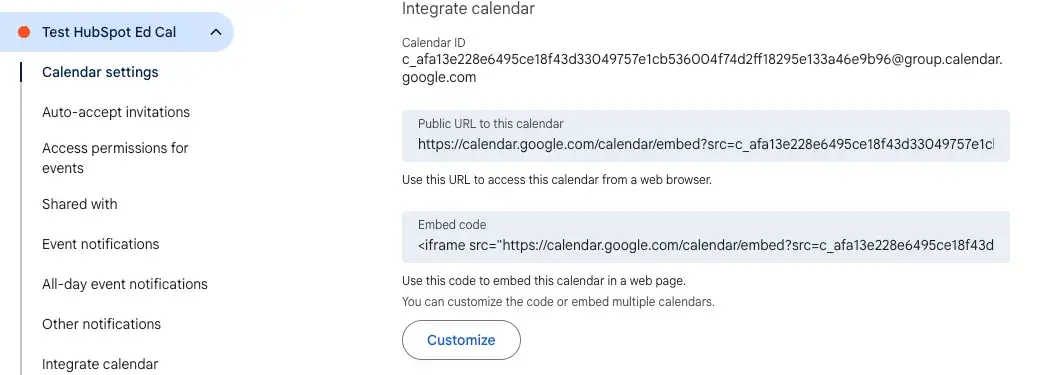
Then find your Calendar ID.
Step 4: One-time upload into Google Calendar (Option A).
From here, you can load it into your Google calendar. There are a few catches:
1. It won’t update automatically and everything must be manual.
2. Google Calendar only supports CSVs with specific column headers, so you’ll need to rename and reorganize your column headers to the following and may not have the level of data you want:
Subject
Start Date
Start Time
End Date
End Time
Description
From here, you’ll need to export the sheet as a CSV then go back to Google Calendar. You’ll then click Settings > Import & Export, select your CSV and then choose the calendar you want to import into.
This is best only if you need quick visibility into your calendar. Otherwise I recommend option B — the auto-magical route :)
Free Editorial Calendar Template
Start planning your editorial strategy with this free template.
- Plan your content strategy.
- Align your channels.
- Define your brand story.
- Measure your success.
Download Free
All fields are required.
Form not available
Step 5: Automatically create calendar events with Google Apps Script (Option B).
Now that your editorial calendar lives in a Google Sheet — and you’ve created a dedicated Google Calendar to map your content dates — it’s time to connect the two.
I’m obsessed with using Apps Scripts to automate things in Google Workspace. This process will help you automatically create a calendar event for each row in your sheet, based on the publish date and title. Keyword: automatically!
And my favorite way to do it is by using ChatGPT to help me create and troubleshoot the scripts.
Here’s the prompt I used:
“I want to connect a Google Sheet to my Google Calendar that automatically updates so I don’t have to manually update calendar with editorial plans. What is the App Script I need? Please walk me through it step by step.”
Then I followed these instructions;
1. Open the Apps Script editor: Extensions → Apps Script
2. Delete any placeholder code and paste this in:
function createCalendarEvents() {
const sheet = SpreadsheetApp.getActiveSpreadsheet().getActiveSheet();
const calendar = CalendarApp.getCalendarById('your-calendar-id@group.calendar.google.com'); // ← Replace this
const data = sheet.getDataRange().getValues();
for (let i = 1; i < data.length; i++) {
const publishDate = data[i][0]; // Column A
const title = data[i][3]; // Column D
const details = data[i][4]; // Column E
const keywords = data[i][5]; // Column F
const author = data[i][2]; // Column C
const cta = data[i][7]; // Column H
const posted = data[i][8]; // Column I (Posted to Calendar?)
if (title && publishDate instanceof Date && !posted) {
const description =
`Author: ${author}\n` +
`Keywords: ${keywords}\n\n` +
`Details:\n${details}\n\n` +
`CTA:\n${cta}`;
calendar.createEvent (title, new Date(publishDate), new Date(publishDate), {
description: description
});
// Mark the row as posted
sheet.getRange(i + 1, 9).setValue(“✓”);
}
}
}
3. Replace: your-calendar-id@group.calendar.google.com with the calendar ID you just found.
4. Save and run the script by clicking the floppy disk icon to save and clicking the run button. If it prompts you to authorize access, follow the steps.
5. Set it to run automatically using the clock icon “Triggers” by creating a new trigger:
Choose which function to run, select: syncEditorialCalendar
Event source: Time-driven
Type of time-based trigger: Hourly, daily, or custom
Click Save

Once it runs, you should see your content show up in the new calendar you made, complete with title, author, and details. And since mine is set up to run every 2 hours, I’ll see those changes at that frequency. You can make this more or less frequent, as needed.
If you get any error messages, just feed them into ChatGPT and keep updating the script. Sometimes it takes a few tries, but the payoff down the road is awesome!
Step 6: Share your editorial calendar with your team.
Once your editorial calendar is set up — whether you’re using the Google Sheet alone or syncing it with Google Calendar — make sure the right people can see it.
If you’re collaborating with a team, this step is what keeps things moving without endless follow-up messages or missed deadlines.
You’ve probably shared a million Google Sheets and Docs using the blue share button in the top right. However, if you’ve never shared a calendar with someone before, you have a few options. All can be accessed in Calendar, by choosing “Access permissions for events”.

Option 1: Event View Availability
You can control whether the calendar is publicly available, available only to those on your domain, or share the link with anyone you choose. You also control the level of event details. Though, for an ed cal, I’d recommend all event details.
Option 2: Share Calendar with Specific People
This one’s pretty straightforward — just choose a person and share the calendar with their Google address.
And there, you have your editorial calendar on Google Calendar!
How to Use Excel or Google Spreadsheets for Editorial Calendars
If you’re a spreadsheet superfan, oh hi— me too! I’ve built entire editorial calendar content systems in Sheets and Excel. They're flexible, easy to share, and perfect for tracking all the moving parts of an editorial calendar, especially if you have a small volume.
The best choice is whether your organization uses Google Workspace or Microsoft Teams.
The editorial calendar template bundle you downloaded includes links to Google Sheets editorial calendar files and an Excel blog editorial calendar template you can adapt to your company.
Google Sheets
To use the Google Sheets option, open the link in the included pdf and select “Make a Copy.”

This will automatically save to your Drive. From there, you can adapt to your schedule/needs and share with team members for easy collaboration.
Excel
Save the Excel file to your Teams folder and share it with the appropriate team members.
Pro tip: Regardless of which spreadsheet you use, only provide “edit” access to people who need it.
Free Editorial Calendar Template
Start planning your editorial strategy with this free template.
- Plan your content strategy.
- Align your channels.
- Define your brand story.
- Measure your success.
Download Free
All fields are required.
Form not available
How to Use Online Calendars for Editorial Calendars
Whether you’re using Google Calendar, Outlook, or iCal to manage your personal and work schedules, you can easily use your online calendar as an editorial calendar . It’s simple, visual, and a great way to stay on top of content without adding another tool to your tech stack.
Here’s how to make it work:
Step 1: Create a new calendar.
Start by creating a separate calendar just for content planning. This keeps your editorial schedule from getting lost among meetings and personal reminders.
- Google Calendar: Go to the left-hand sidebar, click the + next to “Other calendars,” and select Create new calendar. I shared the steps for that above.
- Outlook: Select Add calendar → Create blank calendar

- iCal (Apple Calendar): Click File → New Calendar, and choose iCloud if you want it to sync across devices

Step 2: Rename your calendar.
Regardless of which app, you can name your calendar “Editorial Calendar” and add events.
Step 3: Set up your calendar.
Choose a date and time on the calendar, name the event “Blog Title,” “Email,” “Instagram Post,” etc., and choose how often you want it to recur.
Then you can go into each instance and fill out details like Title, Content Outline, and any other information.
You can then also share that calendar with other people on your team so they can plan accordingly.
How to Use a Project Management Platform for Editorial Calendars
My background in project management is coming out here because I LOVE a good workflow. Apps like Asana, Monday, or ClickUp make great editorial calendars because you can view the content in multiple ways and can get all the visibility you want..
Each content item becomes a “card” or task that can hold everything you need:
- Deadlines and assignees
- Content goals and assets
- Draft links and status updates
- Notes, checklists, subtasks, and even review stages
I’ve found that most allow you to toggle between List, Board, or Calendar views. You can also assign a variety of tasks and subtasks with different deadlines.
And because they’re usually drag and drop, updating your editorial calendar as things change is easy.
Of all the tools out there, I personally love ClickUp and Monday the most because of how much I can customize.
I’m sure others can do similar things, but these work best with my brain and can flex around my process instead of forcing me into something rigid.
And if you’re not sure what’s possible? ChatGPT is your best friend. I’ve used it more times than I can count to build workflows, clean up data fields, and write automations that save me hours.
My point isn’t to use the fanciest tool out there or over-engineer your process. In fact, I’d consider all the potential touchpoints and combine as many as you can to keep things simple.
That said, my biggest goal here is to share some of the best options and then turn you loose to choose one that actually makes your life easier and helps you avoid a million Slack messages asking, “Hey, what’s the status on this?”
Regardless of which option you choose, it’s a good idea to ensure your team understands your content calendar and how to use it to keep your process moving smoothly.
Why Using Google Calendar as an Editorial Calendar Works
There are a lot of ways to manage an editorial calendar. If it works for you, it’s perfect.
If your team already lives in Gmail, it’s one less tool to adopt—or pay for. Plus, it’s easy to loop people in or move things around as your plans evolve. Because they will evolve.

I always tell clients — we’ll lay out the ideal plan, but know that even factoring in a conservative estimate of your bandwidth, what actually happens is always different.
That’s why I love that you can stack multiple calendars — so your content plans can live alongside launch schedules, product pushes, or anything else your team is juggling. Everyone sees what’s happening, what’s coming, and where the gaps are.
Better yet, when you outgrow it, you can connect your Google Calendar to more advanced tools and workflows, making only minor tweaks to the solid editorial system you’ve built.
Create your editorial calendar today.
Over the years, I’ve used everything to manage editorial calendars — from sticky notes plastered all over my screen to Monday.com builds with six layers of automation.
And I firmly believe that there’s a place for everything. (Except maybe for that stack of sticky notes that no longer stick to anything.)
What matters most is that you have a system to keep you and your content on track and focused on moving your business forward..
My advice is threefold:
- Start where you are now
- Use these templates to test what works
- Make the process your own
Your next launch, campaign, or killer piece of content deserves a home on your calendar — not lost in a torrent of Slack messages or buried in a notebook.
Editor's note: This post was originally published in January 2019 and has been updated for comprehensiveness.
Free Editorial Calendar Template
Start planning your editorial strategy with this free template.
- Plan your content strategy.
- Align your channels.
- Define your brand story.
- Measure your success.
Download Free
All fields are required.
Form not available
Content Planning
![What is an editorial calendar? My guide to building one [examples + templates]](https://53.fs1.hubspotusercontent-na1.net/hubfs/53/editorial-calendar-template-1-20241201-388361.webp)


![How to Write a Creative Brief in 11 Simple Steps [Examples + Templates]](https://53.fs1.hubspotusercontent-na1.net/hubfs/53/creative-brief_2.webp)


.webp)
![How I Write SOPs to Streamline My Workflow [+ Free Template]](https://53.fs1.hubspotusercontent-na1.net/hubfs/53/standard-operating-procedure-1-20241226-9205941.webp)